MQTT

MQTT – Class 2 - Group 12
Name:XianYue Xiao
Student ID: 202229013065N
Activity Learning Orientation
Supervisor: Dr. Long Chen
June 2024
Table of Contents
Abstract
Introduction
Team Responsibilities and Individual Contribution
Project Methodology
Group Soft Skills and Technical Skills – Group Project Functions and Components Summary
1.1 Functional Overview
1.2 Main Components
1.2.1 Client.py
1.2.2 Server.py
1.2.3 mysql.py
1.2.4 web development
Brief summary of individual work results
2.1 The results of running the former function
2.2 The GetMessage inheritance class in the client’s documentation
Personal Soft Skills – Technical Skills of Personal Work
3.1 app.py
3.1.1 Explanation of the Flask Code
3.1.2 Summary of Features And Skills
3.2 login.html
3.2.1 Methods and Techniques Used
3.2.2 Functionality
3.3 login-style.css
3.3.1 Explanation of the CSS Code
3.3.2 Summary
3.4 register
3.4.1 HTML Section
3.4.2 CSS Section
3.4.3 JavaScript Section
3.4.4 Summary
Discussion
Result
Project Management
Reference
Appendix
Abstract
During the Activity Oriented Learning course and the learning process of collaborating on this project, Group 12 wrote this project based on a deep understanding of MQTT. The research focus of the project was on group collaboration, sending messages to each other from the message processor (server) and the client (client), the setup and use of databases (mysql) including building a website using Django or Flask as a web backend to build a website, and so on. This project has deepened the understanding of MQTT's ability to transfer messages between various functions of the system. This report first shows the central code of the project in more detail, briefly describes the functionality of each function, and then describes in more detail the author's own code contributions to the project, as well as the functionality of the functions, the skills and soft skills used, and so on.
Introduction
Project Aim & Objectives:
In a digital era where communication is paramount, our team embarked on a mission to develop an instant messaging system that redefines the way users connect and interact online. Everyone could seamlessly register, log in securely, switch between chat rooms effortlessly, and engage in real-time conversations with peace of mind. Our focus steadfast on ensuring robust security measures, including data encryption and stringent user authentication protocols, to safeguard users’ privacy and information integrity.
Our choice of cutting-edge technologies, from programming languages to database systems and communication protocols, reflects our commitment to delivering a state-of-the-art solution that meets the evolving needs of our users. With every line of code and every design decision, we kept the end-users at the forefront, striving to empower them with a platform that fosters meaningful connections and enriches their online experiences.
Purpose of your Research Project:
Learn to write inheritance classes that extend functionality based on base classes, and study how to develop a front-end web page for login and registration in an MQTT project.
Team Responsibilities and Individual Contribution:
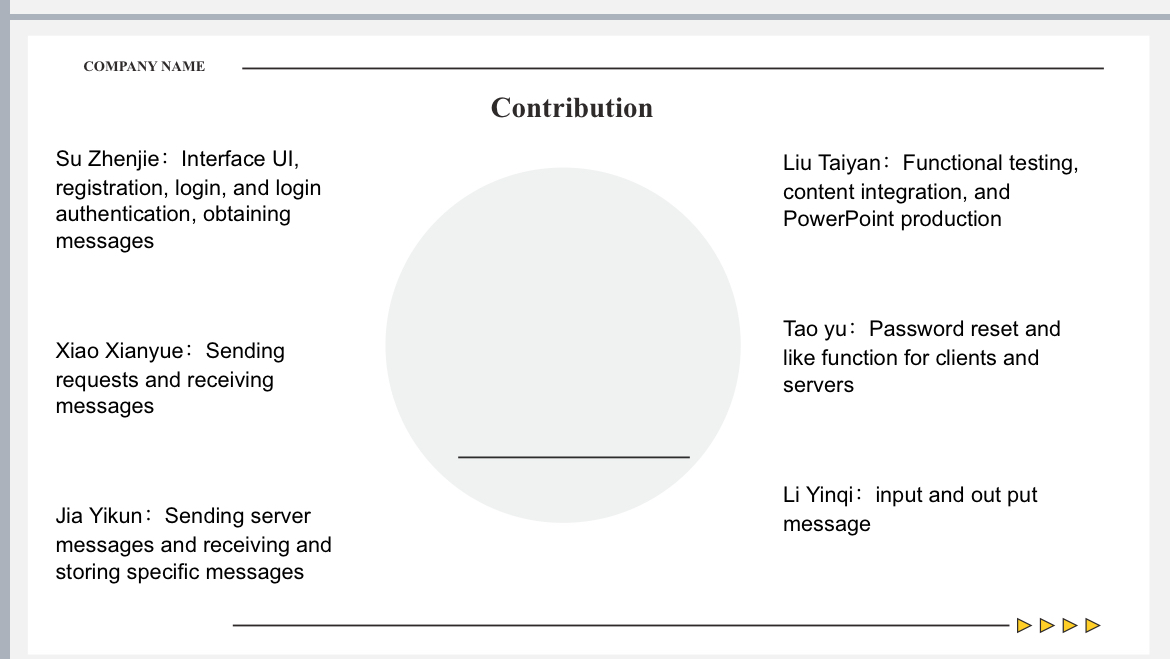
Important note: In the group Presentation, the Flask-based login and registration page that I wrote was not presented! Instead, we showed a Django-based login and registration page written by suzhenjie! Evidence that I have completed a Flask-based page can be found in the link below.
https://github.coventry.ac.uk/suz19/MQTT/tree/main/xiao
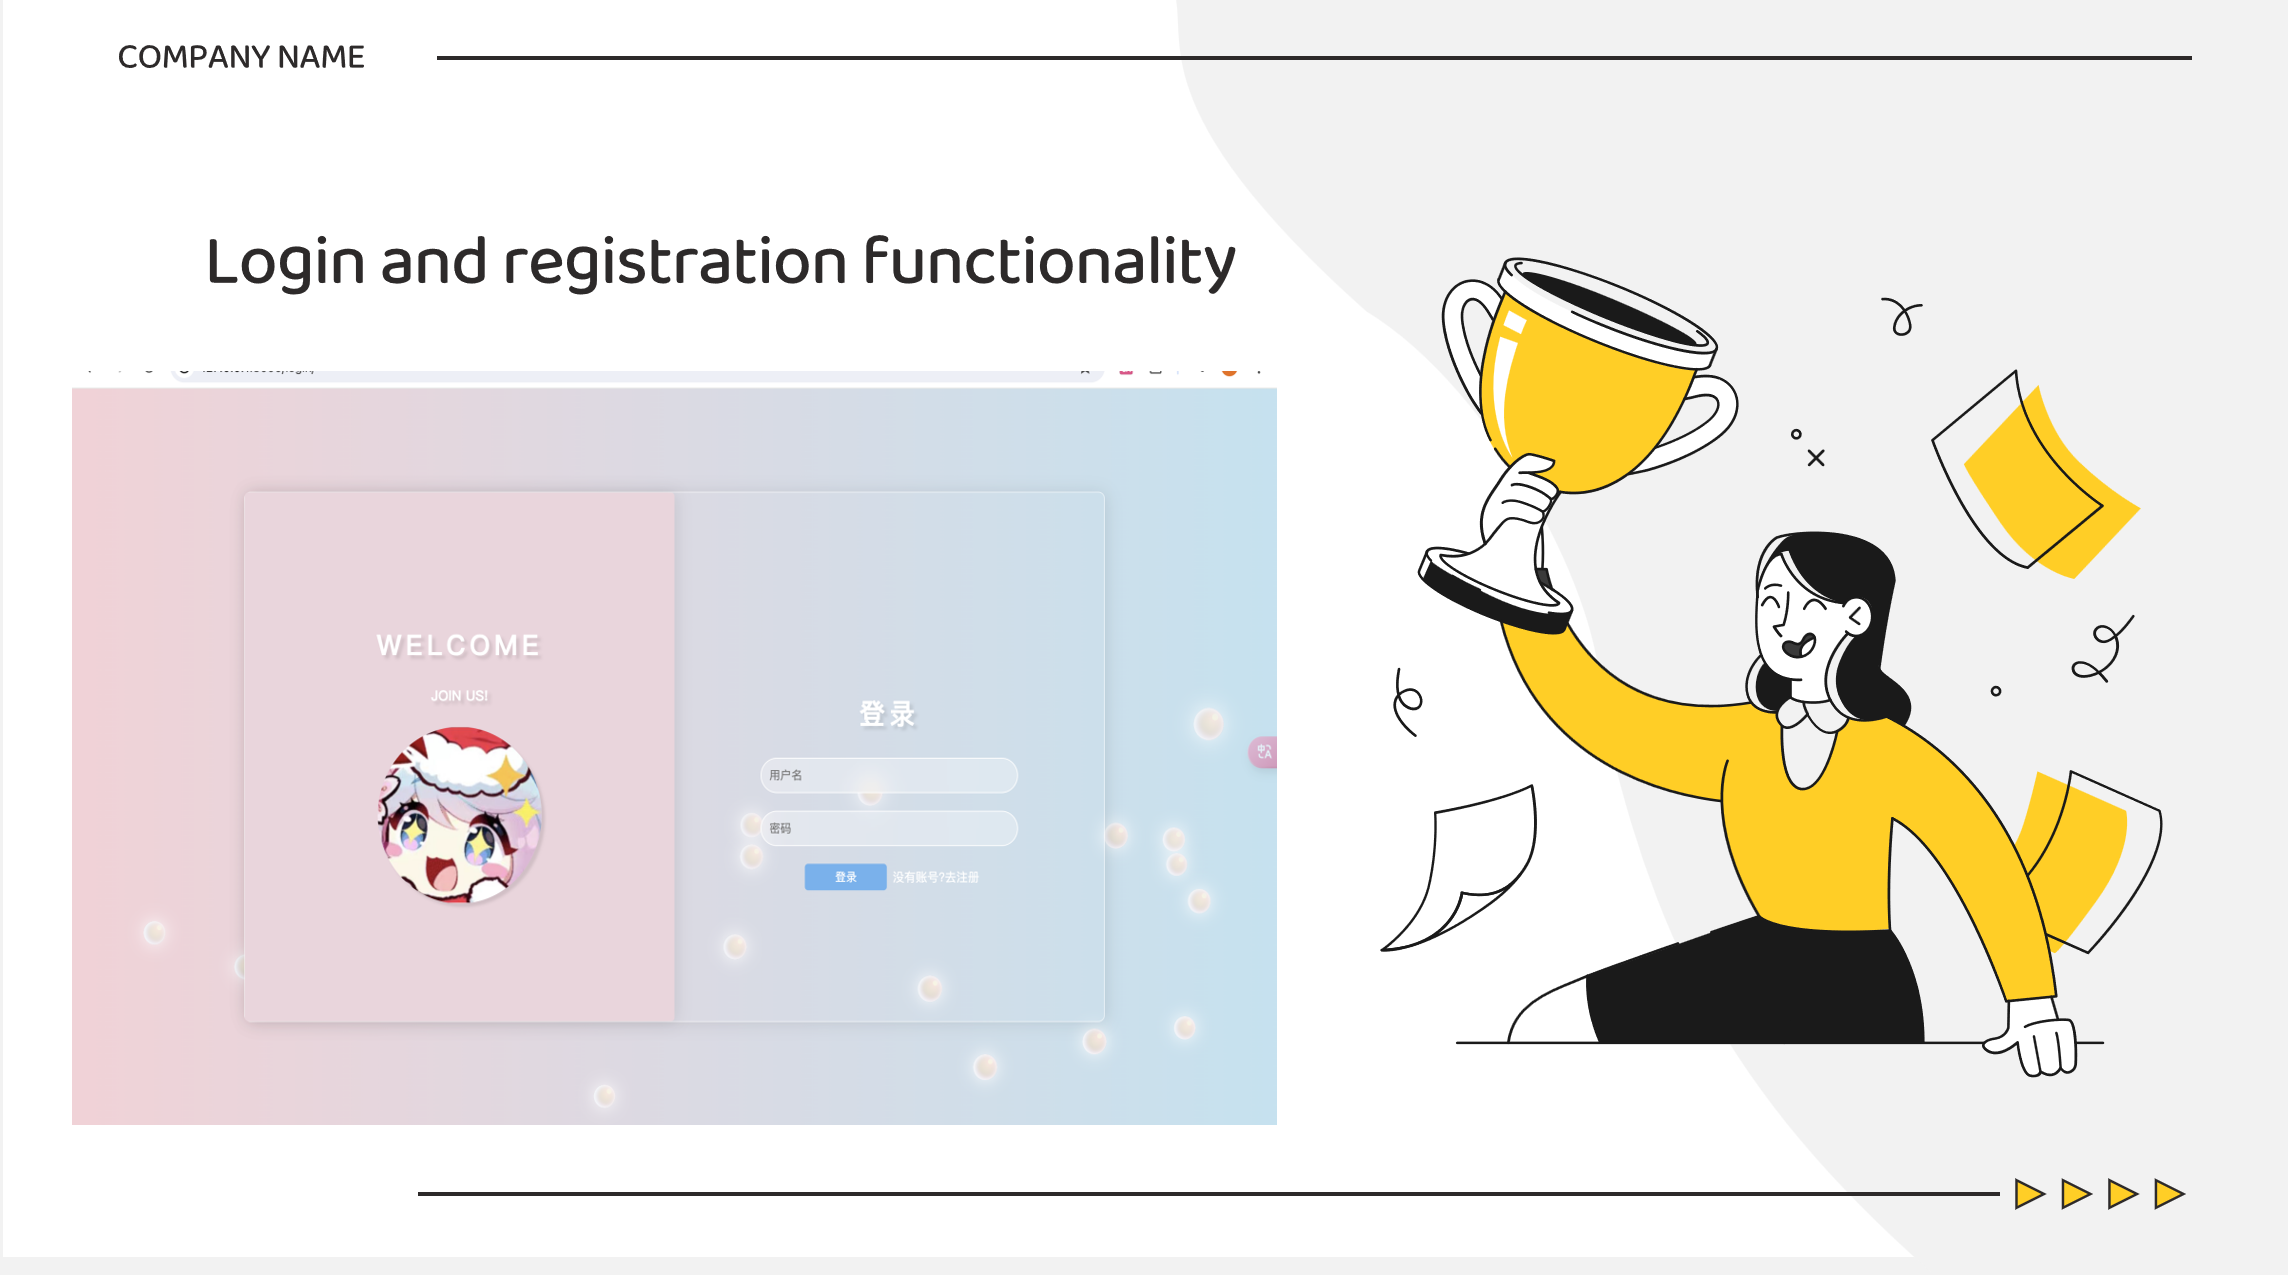
This is suzhenjie written based on Django page design, the author is also involved in the development of the basic framework of this Django, suzhenjie complete optimization.
Project Methodology
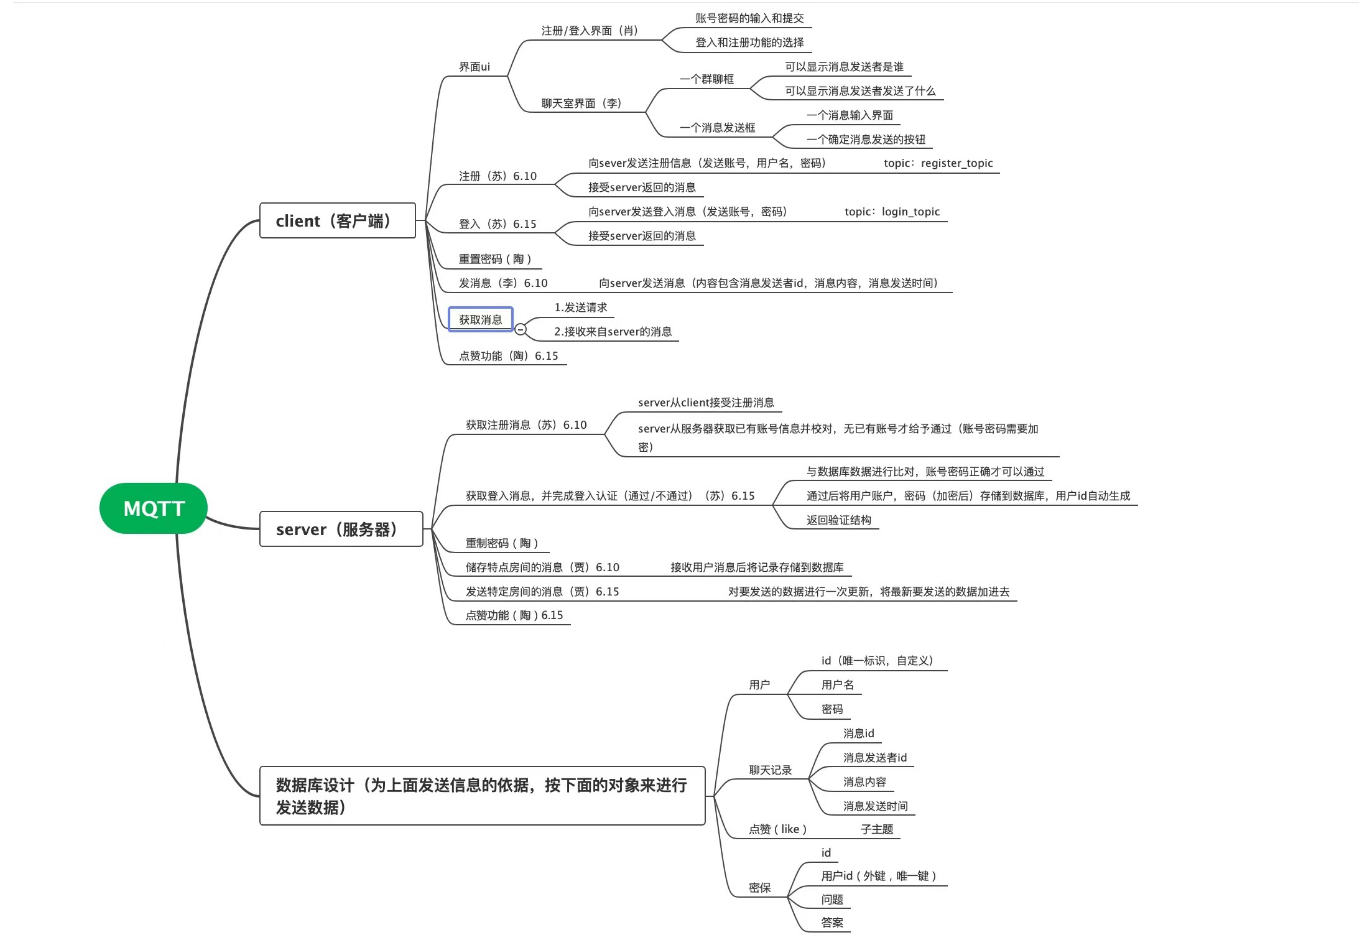
1. Group Project Functions and Components Summary(Group Soft Skills and Technical Skills)
1.1 Functional Overview
The group project is a message communication system based on the MQTT protocol, consisting of a client and a server. Passing information between components through the sever, the client stores the user's information to communicate with the sever.
The purpose is chat room,based on MQTT low data transmission,Our teamwork can be used to serve remote areas with poor network connectivity。
The following section briefly describes the general functionality of the main part of the project, including the sever, client, database and web pages.
1.2 Main Components
1.2.1 Client.py
import paho.mqtt.client as mqtt

from main.config.config import HOST, PORT,publish_topic
from queue import Queue
import datetime
import threading
from threading import Thread, Event
import threading
from queue import Queue
import paho.mqtt.client as mqtt
import time
from abc import abstractmethod


class Client:#基类
    def __init__(self, userName=None,userPwd=None):
        self.userName = userName
        self.userPwd = userPwd
        self.lock = threading.Lock()

        self.loopNum = 0
        self.start_evt = None  # 这是一个Event对象,用来查看是否验证成功
        # 自动在初始化的时候进行链接
        self.client = mqtt.Client()
        self.client.on_connect = self.on_connect
        self.client.on_message = self.on_message
        self.client.connect(HOST, PORT, 60)


    def start_loop(self):
        # 用线程锁来控制同时仅能一个loop_forever
        if self.loopNum == 0:
            self.lock.acquire()
            print('进程锁加载')
            self.loopNum = 1
            self.client._thread_terminate = False
            self.client.loop_forever()

    def stop_loop(self):
        # 停止这个线程
        if self.loopNum == 1:
            self.lock.release()
            print('进程锁结束!!')
            self.client._thread_terminate = True
            self.loopNum = 0

    @abstractmethod
    def on_connect(self, client, userdata, flags, rc):
        pass

    @abstractmethod
    def on_message(self, client, userdata,  msg):
        pass
    def clientStart(self):#启动进程,使用threading(python自带进程管理库)进行管理
        loopThread = threading.Thread(target=self.start_loop)
        loopThread.start()
        return loopThread


class Register(Client):
    def __init__(self,userName,userPwd):
        super().__init__(userName,userPwd)
        self.flag=False #标志注册是否成功
        self.clientStart()
        self.publishRegister()


    def on_connect(self, client, userdata, flags, rc):#链接
        if rc == 0:
            print("Connected successfully")
            returnRegister=self.userName+"register"
            client.subscribe(returnRegister) # 订阅 return 主题
        else:
            print("Failed to connect, return code %d\n", rc)

    def on_message(self,client, userdata,  msg):#接受数据
        # 规定传入数据均为dict的形式

        data = eval(msg.payload.decode('utf-8'))
        #读取数据
        code=data.get('code')
        message=data.get('message')
        if code==0:
            print(message)
        if code==1:
            self.flag=True #成功了更新
            print(message)
        return data

    def publishRegister(self):
        returnTopic=self.userName+"register"
        #数据发送特定格式
        data = {'userName': self.userName, 'userPwd': self.userPwd, 'returnTopic': returnTopic}
        # qos1
        self.client.publish(publish_topic["register_topic"], str(data).encode(), 1)
        # client.loop()
        print('发布信息 ', publish_topic['register_topic'], ' 成功')

class Login(Client):
    def __init__(self,userName,userPwd):
        super().__init__(userName,userPwd)
        self.flag=False
        self.clientStart()
        self.publishLogin()

    def on_connect(self, client, userdata, flags, rc):#链接
        if rc == 0:
            print("Connected successfully")
            returnLogin=self.userName+"login"
            client.subscribe(returnLogin) # 订阅 return 主题
        else:
            print("Failed to connect, return code %d\n", rc)

    def on_message(self,client, userdata,  msg):#接受数据
        # 规定传入数据均为dict的形式

        data = eval(msg.payload.decode('utf-8'))
        #读取数据
        code=data.get('code')
        message=data.get('message')
        if code==0:  #表示登入失败
            print(message)
        if code==1:  #表示登入成功
            self.flag=True
            print(message)
        return data

    def publishLogin(self):
        returnTopic=self.userName+"login"
        #数据发送特定格式
        data = {'userName': self.userName, 'userPwd': self.userPwd, 'returnTopic': returnTopic}
        # qos1
        self.client.publish(publish_topic["login_topic"], str(data).encode(), 1)
        # client.loop()
        print('发布信息 ', publish_topic['login_topic'], ' 成功')

######################################
#xiao
class GetMessage(Client):
    def __init__(self, userName):
        super().__init__(userName=userName)
        self.messages=[]
        self.clientStart()
        self.publishGetAllMessage()

    def on_connect(self, client, userdata, flags, rc):  # 链接
        if rc == 0:
            print("Connected successfully")
            returnLogin = self.userName + "chatall"
            client.subscribe(returnLogin)  # 订阅 chatall 主题
        else:
            print("Failed to connect, return code %d\n", rc)

    def on_message(self, client, userdata, msg):  # 接受数据
        # 规定传入数据均为dict的形式

        messages = eval(msg.payload.decode('utf-8'))
        # 读取数据
        self.messages=messages #返回一个字典的列表,['id':id,'senderID':senderID,'message':message]存到类中
        print(messages)


    def publishGetAllMessage(self):
        returnTopic = self.userName + "chatall"
        # 数据发送特定格式
        data = {'userName': self.userName, 'returnTopic': returnTopic}
        # qos1
        self.client.publish("chatall", str(data).encode(), 1)
        # client.loop()
        print('发布信息 ', "chatall", ' 成功')

######################################
#jia yikun
class SendMessage(Client):
    def __init__(self, userName, msg):
        super().__init__(userName=userName)
        self.message=msg
        self.clientStart()
        self.publishSendMessage()

    def on_connect(self, client, userdata, flags, rc):  # 链接
        if rc == 0:
            print("Connected successfully")
            returnLogin = self.userName + "chatsend"
            client.subscribe(returnLogin)  # 订阅 chatall 主题
        else:
            print("Failed to connect, return code %d\n", rc)

    def on_message(self, client, userdata, msg):  # 接受数据
        # 规定传入数据均为dict的形式

        data = eval(msg.payload.decode('utf-8'))
        # 读取数据
        code = data.get('code')
        message = data.get('message')
        if code == 0:  # 表示发送消息失败
            print(message)
        if code == 1:  # 表示发送消息成功
            print(message)
        return data


    def publishSendMessage(self):
        returnTopic = self.userName + "chatsend"
        # 数据发送特定格式
        data = {'userName': self.userName,'message':self.message, 'returnTopic': returnTopic}
        # qos1
        self.client.publish("chatsend", str(data).encode(), 1)
        # client.loop()
        print('发布信息 ', "chatsend", ' 成功')


######################################
#tao yu
class Like(Client):
    def __init__(self,messageId):
        super().__init__()
        self.clientStart()
        self.publish_like(messageId)

    @abstractmethod
    def on_connect(self, client, userdata, flags, rc):
        pass

    @abstractmethod
    def on_message(self, client, userdata, msg):
        pass

    def publish_like(client, messageId):
        data = {'message_id': messageId}
        client.publish(publish_topic['like_topic'], str(data).encode(), 1)
        print(f'发布信息到 {publish_topic["like_topic"]} 成功')


class SecurityQuestion(Client):
    def __init__(self, userName, question=None, answer=None, new_password=None):
        super().__init__(userName)
        self.question = question
        self.answer = answer
        self.clientStart()
        if userName and question and answer and new_password:
            self.reset_password(answer,new_password)
        elif userName and question and answer:
            self.set_security_question()
        else:
            self.request_security_question()

    def on_connect(self, client, userdata, flags, rc):
        if rc == 0:
            print("连接成功")
            returnTopic = self.userName + "security"
            client.subscribe(returnTopic)
        else:
            print("连接失败,返回码 %d\n", rc)

    def on_message(self, client, userdata, msg):
        data = eval(msg.payload.decode('utf-8'))
        print(data)
        if data.get('action') == 'set_question':
            print(data.get('code'))
        elif data.get('action') == 'request_question':
            print(f"Security Question: {data.get('question')}")
        elif data.get('action') == 'verify_security_answer':
            print(data.get('code'))
        return data

    def set_security_question(self):
        returnTopic = self.userName + "security"
        data = {
            'action': 'set_question',
            'userName': self.userName,
            'question': self.question,
            'answer': self.answer,
            'returnTopic': returnTopic
        }
        self.client.publish('set_security_question', str(data).encode(), 1)
        print(f'发布信息到 set_security_question_response 成功')

    def request_security_question(self):
        returnTopic = self.userName + "security"
        data = {
            'action': 'request_question',
            'userName': self.userName,
            'returnTopic': returnTopic
        }
        self.client.publish('request_security_question', str(data).encode(), 1)
        print(f'发布信息到 request_security_question 成功')

    def reset_password(self, answer, new_password):
        returnTopic = self.userName + "security"
        data = {
            'action': 'reset_password',
            'userName': self.userName,
            'answer': answer,
            'newPassword': new_password,
            'returnTopic': returnTopic
        }
        self.client.publish('verify_security_answer', str(data).encode(), 1)
        print(f'发布信息到 verify_security_answer 成功')


####################################################################
def main():
    SendMessage("1234","1234")


main()- Client: A base class for clients, initializing the MQTT client, managing connection and message handling, and providing methods for starting and stopping the MQTT loop. It includes abstract methods
on_connectandon_messageto be implemented by subclasses. - Register: Inherits from
Clientand handles user registration. It connects to the MQTT broker, subscribes to a specific topic for registration responses, and publishes registration data. - Login: Inherits from
Clientand handles user login. It connects to the MQTT broker, subscribes to a specific topic for login responses, and publishes login data. - GetMessage: Inherits from
Clientand retrieves messages. It connects to the MQTT broker, subscribes to a topic to receive all messages, and stores received messages in a list. - SendMessage: Inherits from
Clientand sends messages. It connects to the MQTT broker, subscribes to a topic for sending message responses, and publishes the message data. - Like: Inherits from
Clientand handles liking messages. It connects to the MQTT broker and publishes a like action for a specific message ID. - SecurityQuestion: Inherits from
Clientand manages security questions for user accounts. It can set a security question, request a security question, and reset the password based on the security answer.
1.2.2 Server.py
import paho.mqtt.client as mqtt

from main.config.config import HOST, PORT,publish_topic
from queue import Queue
import datetime
import threading
from threading import Thread, Event
import threading
from queue import Queue
import paho.mqtt.client as mqtt
from main.mysql import *
from abc import abstractmethod
import time

class Server:
    def __init__(self):
        self.client = mqtt.Client()
        self.client.on_connect = self.on_connect
        self.client.on_message = self.on_message
        self.client.connect(HOST, PORT, 60)
        self.lock = threading.Lock()
        self.loopNum = 0

    def start_loop(self):
        # 用线程锁来控制同时仅能一个loop_forever
        if self.loopNum == 0:
            self.lock.acquire()
            print('进程锁加载')
            self.loopNum = 1
            self.client._thread_terminate = False
            self.client.loop_forever()

    def stop_loop(self):
        # 停止这个线程
        if self.loopNum == 1:
            self.lock.release()
            print('进程锁结束!!')
            self.client._thread_terminate = True
            self.loopNum = 0

    def serverStart(self):#启动进程,使用threading(python自带进程管理库)进行管理
        loopThread = threading.Thread(target=self.start_loop)
        loopThread.start()
        return loopThread

    @abstractmethod
    def on_connect(self, client, userdata, flags, rc):
        if rc == 0:
            print("Connected successfully")
            client.subscribe('test')  # 订阅 login 主题
        else:
            print("Failed to connect, return code %d\n", rc)

    @abstractmethod
    def on_message(self, client, userdata, msg):
        # 规定传入数据均为dict的形式
        data = eval(msg.payload.decode('utf-8'))
        print(data)
        return data


class Register(Server):
    def __init__(self):
        super().__init__()
        self.serverStart()
    def on_connect(self, client, userdata, flags, rc):
        if rc == 0:
            print("Connected successfully")
            client.subscribe(publish_topic['register_topic'])  # 订阅 register 主题
        else:
            print("Failed to connect, return code %d\n", rc)
    def on_message(self, client, userdata, msg):
        # 规定传入数据均为dict的形式
        data = eval(msg.payload.decode('utf-8'))
        print(data)
        userName = data.get('userName')
        userPwd = data.get('userPwd')
        returnTopic = data.get('returnTopic')
        self.register(userName, userPwd, returnTopic)
        return data

    def register(self, userName, userPwd, returnTopic):
        user = UserManage.chackName(userName)
        if user == None:
            print("用户不存在,允许注册")
            if UserManage.addUser(userName, userPwd):
                print("用户添加成功!")
                data = {'code': 1, "message": "用户添加成功!"}
                self.client.publish(returnTopic, str(data).encode(), 1)
            else:
                print("用户添加失败,错误发生在服务器!")
                data = {'code': 0, "message": "用户添加失败,错误发生在服务器!"}
                self.client.publish(returnTopic, str(data).encode(), 1)
        else:
            print("用户存在,不允许注册")
            data = {'code': 0, "message": "用户添加失败,用户存在"}
            self.client.publish(returnTopic, str(data).encode(), 1)


class Login(Server):
    def __init__(self):
        super().__init__()
        self.serverStart()


    def on_connect(self, client, userdata, flags, rc):
        if rc == 0:
            print("Connected successfully")
            client.subscribe(publish_topic['login_topic'])  # 订阅 login 主题
        else:
            print("Failed to connect, return code %d\n", rc)

    def on_message(self, client, userdata, msg):
        # 规定传入数据均为dict的形式
        data = eval(msg.payload.decode('utf-8'))
        print(data)
        userName = data.get('userName')
        userPwd = data.get('userPwd')
        returnTopic = data.get('returnTopic')
        self.login(userName, userPwd, returnTopic)
        return data

    def login(self, userName, userPwd, returnTopic):
        user = UserManage.chackName(userName)
        if user == None:
            print("账号或密码错误")
            data = {'code': 0, 'message':"账号或密码错误"}
            self.client.publish(returnTopic, str(data).encode(), 1)
        else:
            if UserManage.verifyUser(userName,userPwd):
                print(f"{userName}通过验证,欢迎")
                data = {'code': 1, "message": f"验证通过,欢迎回来{userName}"}
                self.client.publish(returnTopic, str(data).encode(), 1)
            else:
                print("账号或密码错误")
                data = {'code': 0, 'message': "账号或密码错误"}
                self.client.publish(returnTopic, str(data).encode(), 1)


###################################################################
#taoyu
class Like(Server):
    def __init__(self):
        super().__init__()
        self.serverStart()

    def on_connect(self, client, userdata, flags, rc):
        if rc == 0:
            print("Connected successfully")
            client.subscribe('like')
        else:
            print("Failed to connect, return code %d\n", rc)

    def on_message(self, client, userdata, msg):
        data = eval(msg.payload.decode('utf-8'))
        messageId = data.get('message_id')
        returnTopic = data.get('returnTopic')
        print("Publishing to topic:", returnTopic)
        self.like_message(messageId, returnTopic)
    def like_message(self, messageId, returnTopic):
        like_count = LikeManage.like_message(messageId)
        if like_count is not None:
            data = {'code': 1, 'like_count': like_count}
            self.client.publish(returnTopic, str(data).encode(), 1)
        else:
            data = {'code': 0, 'message': '点赞失败'}
            self.client.publish(returnTopic, str(data).encode(), 1)


class SecurityServer(Server):
    def __init__(self):
        super().__init__()
        self.serverStart()

    def on_connect(self, client, userdata, flags, rc):
        if rc == 0:
            print("连接成功")
            client.subscribe('set_security_question')
            client.subscribe('request_security_question',)
            client.subscribe('verify_security_answer')
        else:
            print("连接失败,返回码 %d\n", rc)

    def on_message(self, client, userdata, msg):
        data = eval(msg.payload.decode('utf-8'))
        if msg.topic == 'set_security_question':
            user_name = data.get('userName')
            question = data.get('question')
            answer = data.get('answer')
            returnTopic = data.get('returnTopic')
            success = SecurityQuestionManage.set_security_question(user_name, question, answer)
            if success == True:
                code = 1
            else:
                code = 0
            data = {
                'action': 'set_question',
                'code': code
            }
            client.publish(returnTopic, str(data).encode(), 1)

        elif msg.topic == 'request_security_question':
            user_name = data.get('userName')
            returnTopic = data.get('returnTopic')

            user = UserModel.get(UserModel.name == user_name)
            security_question = SecurityQuestionModel.get(SecurityQuestionModel.user_id == user.id)
            data = {
                'action': 'request_question',
                'question': security_question.question
            }
            client.publish(returnTopic, str(data).encode(), 1)

        elif msg.topic == 'verify_security_answer':
            user_name = data.get('userName')
            answer = data.get('answer')
            newPassword = data.get('new_password')
            returnTopic = data.get('returnTopic')
            success = SecurityQuestionManage.verify_security_answer(user_name, answer, newPassword)
            if success: code = 1
            else: code = 0
            data = {
                'action': 'verify_security_answer',
                'code': code
            }
            client.publish(returnTopic, str(data).encode(), 1)

###################################################################################
#jia yikun
class ChatSave(Server):
    def __init__(self):
        super().__init__()
        self.serverStart()

    def on_connect(self,client, userdata, flags, rc):

        if rc==0:
            #self.connected=True
            print("Connected successfully")
            client.subscribe('chatsend')  # 订阅 chat 主题
        else:
            raise Exception("Failed to connect mqtt server.")

    def on_message(self, client, userdata, msg):
        # 接收用户消息
        data = eval(msg.payload.decode('utf-8'))
        message = data.get('message')
        userName = data.get('userName')
        print(data)
        returnTopic = data.get('returnTopic')
        user=UserManage.chackName(userName)
        if user == None:
            data = {'code': 0, 'message': "消息发送失败,找不到用户"}
            self.client.publish(returnTopic, str(data).encode(), 1)
        else:
            print('new_message  ',user.id,':', message)
            if ChatManage.AddChat(message, user.id,userName):
                data = {'code': 1, 'message': "消息发送成功"}
                self.client.publish(returnTopic, str(data).encode(), 1)
            else:
                data = {'code': 0, 'message': "消息发送失败"}
                self.client.publish(returnTopic, str(data).encode(), 1)

class ChatAll(Server):
    def __init__(self):
        super().__init__()
        self.serverStart()

    def on_connect(self,client, userdata, flags, rc):

        if rc==0:
            #self.connected=True
            print("Connected successfully")
            client.subscribe('chatall')  # 订阅 chat 主题
        else:
            raise Exception("Failed to connect mqtt server.")

    def on_message(self, client, userdata, msg):
        # 接收用户消息
        data = eval(msg.payload.decode('utf-8'))
        returnTopic = data.get('returnTopic')
        chat = ChatManage()
        payload = str(chat.getAllManage())
        return self.client.publish(returnTopic, payload=payload, qos=2, retain=False)


###################################################################################
def main():
    a=Register()  #进程1,处理注册
    b=Login()     #进程2,处理登入
    c=Like()      #进程3,处理点赞
    d=ChatAll()   #进程4,处理所有消息
    e=ChatSave()  #进程5,处理消息保存

main()1.Server: A base class for server functionalities, initializing the MQTT client, handling connection and message reception, and managing the MQTT loop with threading.
2.Register: Inherits from Server and handles user registration. It subscribes to a topic for registration requests, receives user data, and processes the registration using a user management system.
3.Login: Inherits from Server and handles user login. It subscribes to a topic for login requests, receives user data, and verifies the login credentials using a user management system.
4.Like: Inherits from Server and handles liking messages. It subscribes to a topic for like actions, receives the message ID, and processes the like using a like management system.
5.SecurityServer: Inherits from Server and manages security questions for user accounts. It subscribes to topics for setting, requesting, and verifying security questions and answers, and processes these requests accordingly.
6.ChatSave: Inherits from Server and handles saving chat messages. It subscribes to a topic for sending messages, receives message data, and saves the message using a chat management system.
7.ChatAll: Inherits from Server and handles retrieving all chat messages. It subscribes to a topic for retrieving messages and responds with all stored messages.
1.2.3 mysql.py
from main.config.config import mysql_config
from peewee import *
import bcrypt
import datetime


#链接数据库
db = MySQLDatabase(mysql_config['db_name'], user=mysql_config['db_user'], password=mysql_config['db_password'],
                   host=mysql_config['db_host'], port=mysql_config['db_port'])

#数据对象
#######################################################
#基类
class BaseModel(Model):
    class Meta:
        database = db

#用户类
class UserModel(BaseModel):
    id=AutoField()
    name = CharField(max_length=64)
    password = CharField(max_length=128)


    class Meta:
        db_table = 'user'


#信息类
class ChatModel(BaseModel):
    id=AutoField()
    message = TextField()
    senderId=BigIntegerField()
    time = DateTimeField(default=datetime.datetime.now)
    senderName=CharField(max_length=64)
    class Meta:
        db_table = 'chat'

#点赞类
class LikeModel(BaseModel):
    id = AutoField()
    messageId = ForeignKeyField(ChatModel, backref='likes')
    count = IntegerField(default=0)

    class Meta:
        db_table = 'like'

class CreateTable:
    @staticmethod
    def create():
        db.connect()
        db.create_tables([UserModel, ChatModel,LikeModel,SecurityQuestionModel])


#用户操作
##########################################
def hash_password(password):
    # 生成盐值
    salt = bcrypt.gensalt()
    # 生成哈希值
    hashed = bcrypt.hashpw(password.encode('utf-8'), salt)
    return hashed

# 验证密码
def check_password(hashed, password):
    # 验证密码
    return bcrypt.checkpw(password.encode('utf-8'), hashed)


#用户信息传递
class UserManage:
    @staticmethod
    def chackName(name):#检测用户是否存在,不存在则打印提示并返回None,否则返回UserModel
        try:
            user = UserModel.get(UserModel.name == name)
            return user
        except UserModel.DoesNotExist:
            print(f"No user found with name: {name}")
            return None
        except Exception as error:
            print(f"An error occurred: {error}")
            return None
    @staticmethod
    def chackPassword(password):#如果密码正确则返回True
            # 密码加密
            hashPassword = hash_password(password)
            return check_password(hashPassword,password)


    @staticmethod
    def addUser(name, password):
        try:
            pwd = hash_password(password)
            UserModel.insert(name=name, password=pwd).execute()
            return True
        except Exception as error:
            print(error)
            return False

    @staticmethod
    def verifyUser(name, password):
        user = UserManage.chackName(name)
        if user is None:
            return False
        hashed_password_bytes = user.password.encode('utf-8')
        return check_password(hashed_password_bytes, password)

################################################################
class ChatManage:

    # 获取并返回所有 chat 数据
    @staticmethod
    def getAllManage():
        try:
            all_chats = ChatModel.select()
            # 将数据转换为列表形式
            chat_list = []
            for chat in all_chats:
                chat_data = {
                    'id': chat.id,
                    'message': chat.message,
                    'senderId': chat.senderId,
                    'time': chat.time,
                    'senderName':chat.senderName
                }
                chat_list.append(chat_data)
            return chat_list
        except Exception as error:
            print(error)
            return None

    @staticmethod
    def AddChat(message,senderId,senderName):
        try:
            ChatModel.insert(message=message,senderId=senderId,senderName=senderName).execute()
            return True
        except Exception as error:
            print(error)
            return False


...1.Database Configuration
- Database Connection: Connects to a MySQL database using configurations provided in
mysql_config.
2.Models
BaseModel: A base model that all other models inherit from, setting the database to use.
UserModel: Represents a user with fields for user ID, name, and password.
ChatModel: Represents a chat message with fields for message ID, message content, sender ID, timestamp, and sender name.
LikeModel: Represents a like on a message with fields for like ID, message ID (foreign key to
ChatModel), and count of likes.SecurityQuestionModel: Represents a security question for a user with fields for user ID (foreign key to
UserModel), the security question, and the hashed answer.
3.Table Creation
- CreateTable: A static method to create the database tables for
UserModel,ChatModel,LikeModel, andSecurityQuestionModel.
4.User Management
- UserManage: Provides static methods to manage user operations:
chackName(name): Checks if a user exists by name.chackPassword(password): Checks if a password is correct by comparing it with the stored hash.addUser(name, password): Adds a new user with a hashed password.verifyUser(name, password): Verifies a user's credentials.
5.Chat Management
- ChatManage: Provides static methods to manage chat operations:
getAllManage(): Retrieves and returns all chat messages.AddChat(message, senderId, senderName): Adds a new chat message.
6.Like Management
- LikeManage: Provides a static method to manage likes on messages:
like_message(messageId): Increments the like count for a message.
7.Security Question Management
- SecurityQuestionManage: Provides static methods to manage security questions:
set_security_question(user_name, question, answer): Sets a security question and stores the hashed answer for a user.verify_security_answer(user_name, answer, new_password): Verifies the security answer and resets the password if correct.reset_password(user_name, new_password): Resets the password for a user.
8.Utility Functions
- hash_password(password): Generates a hashed password using bcrypt.
- check_password(hashed, password): Checks if a provided password matches the hashed password.
- display_all_users(): Displays all users along with the timestamp of their last message.
9.Initialization
- CreateTable.create(): Creates the necessary tables in the database by calling the
create()method of theCreateTableclass.
This code essentially sets up the backend for a messaging system with functionalities for user registration and login, chat message handling, liking messages, and managing security questions.
1.2.4 web development
Includes front-end pages for login registration and chat. Author was personally responsible for the basic framework of the page developed in Django and the login and registration interface developed and optimized in Flask.
2. Brief summary of individual work results
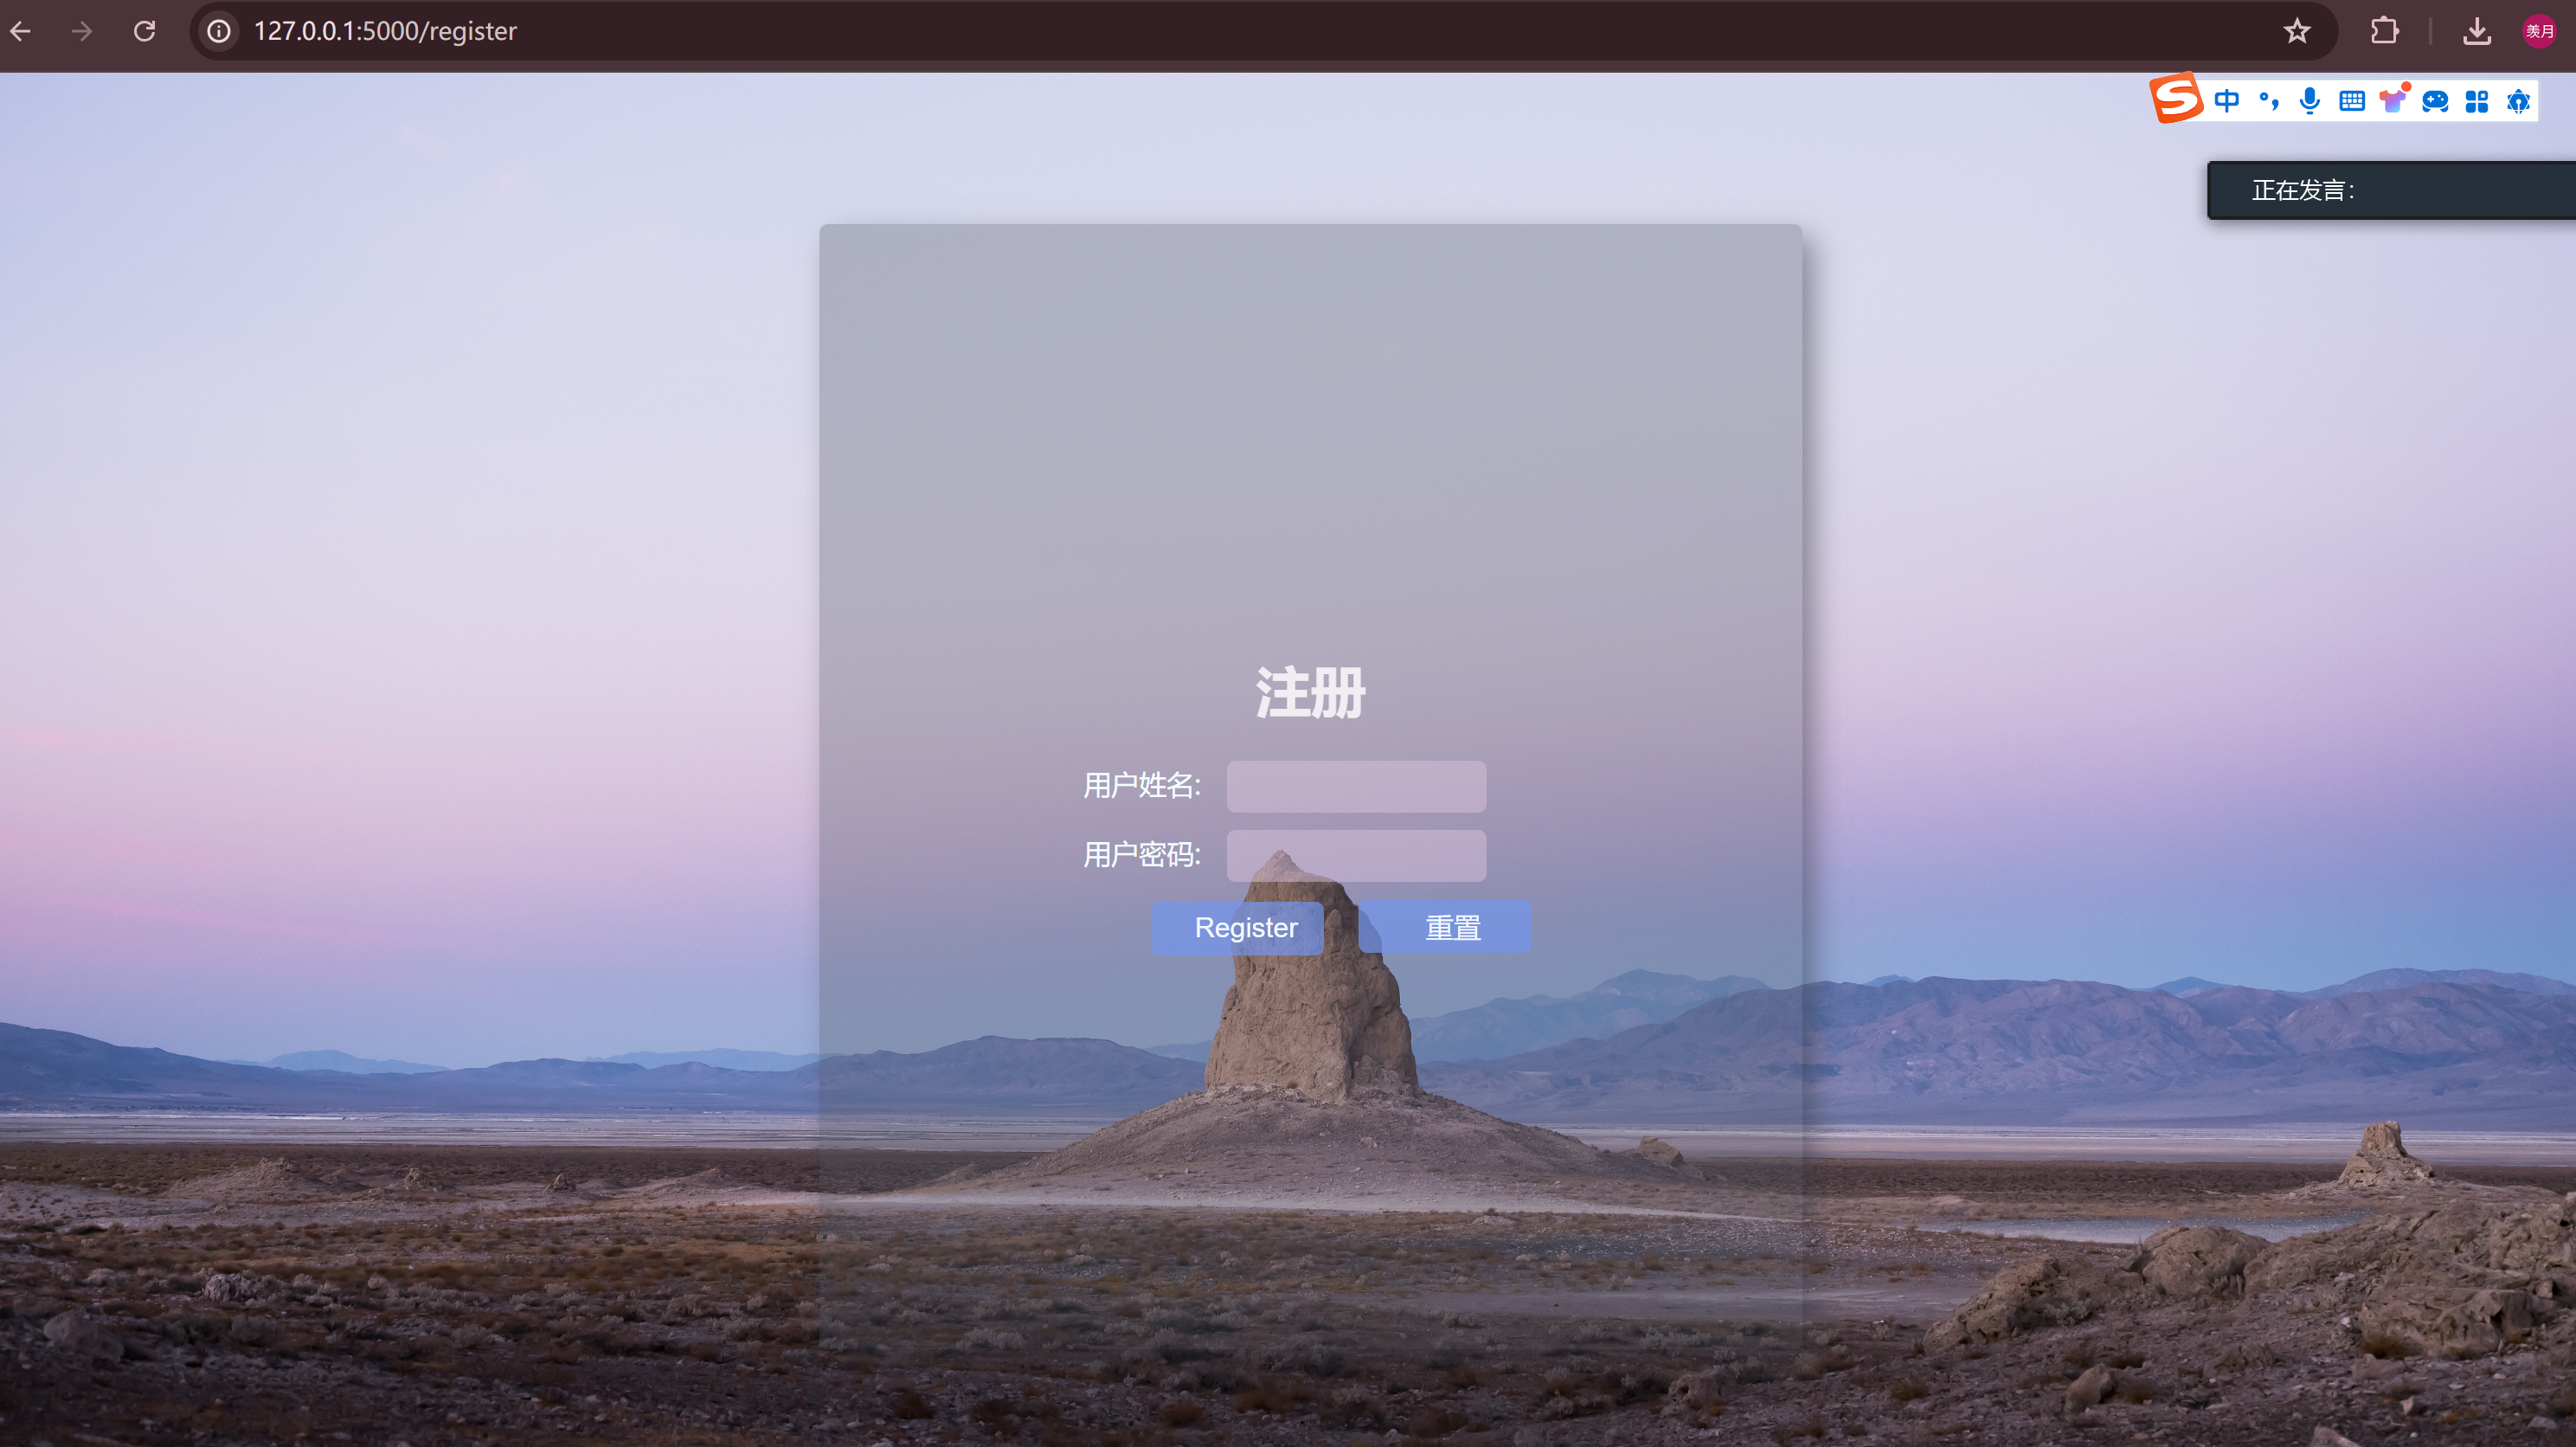
This section reports on the author's own contributions to the project, including the front-end of the login and registration interface and a client inheritance class for receiving messages. The following shows the running results of the login and registration interface, as well as the code of the inherited class.
2.1 The results of running the former function:
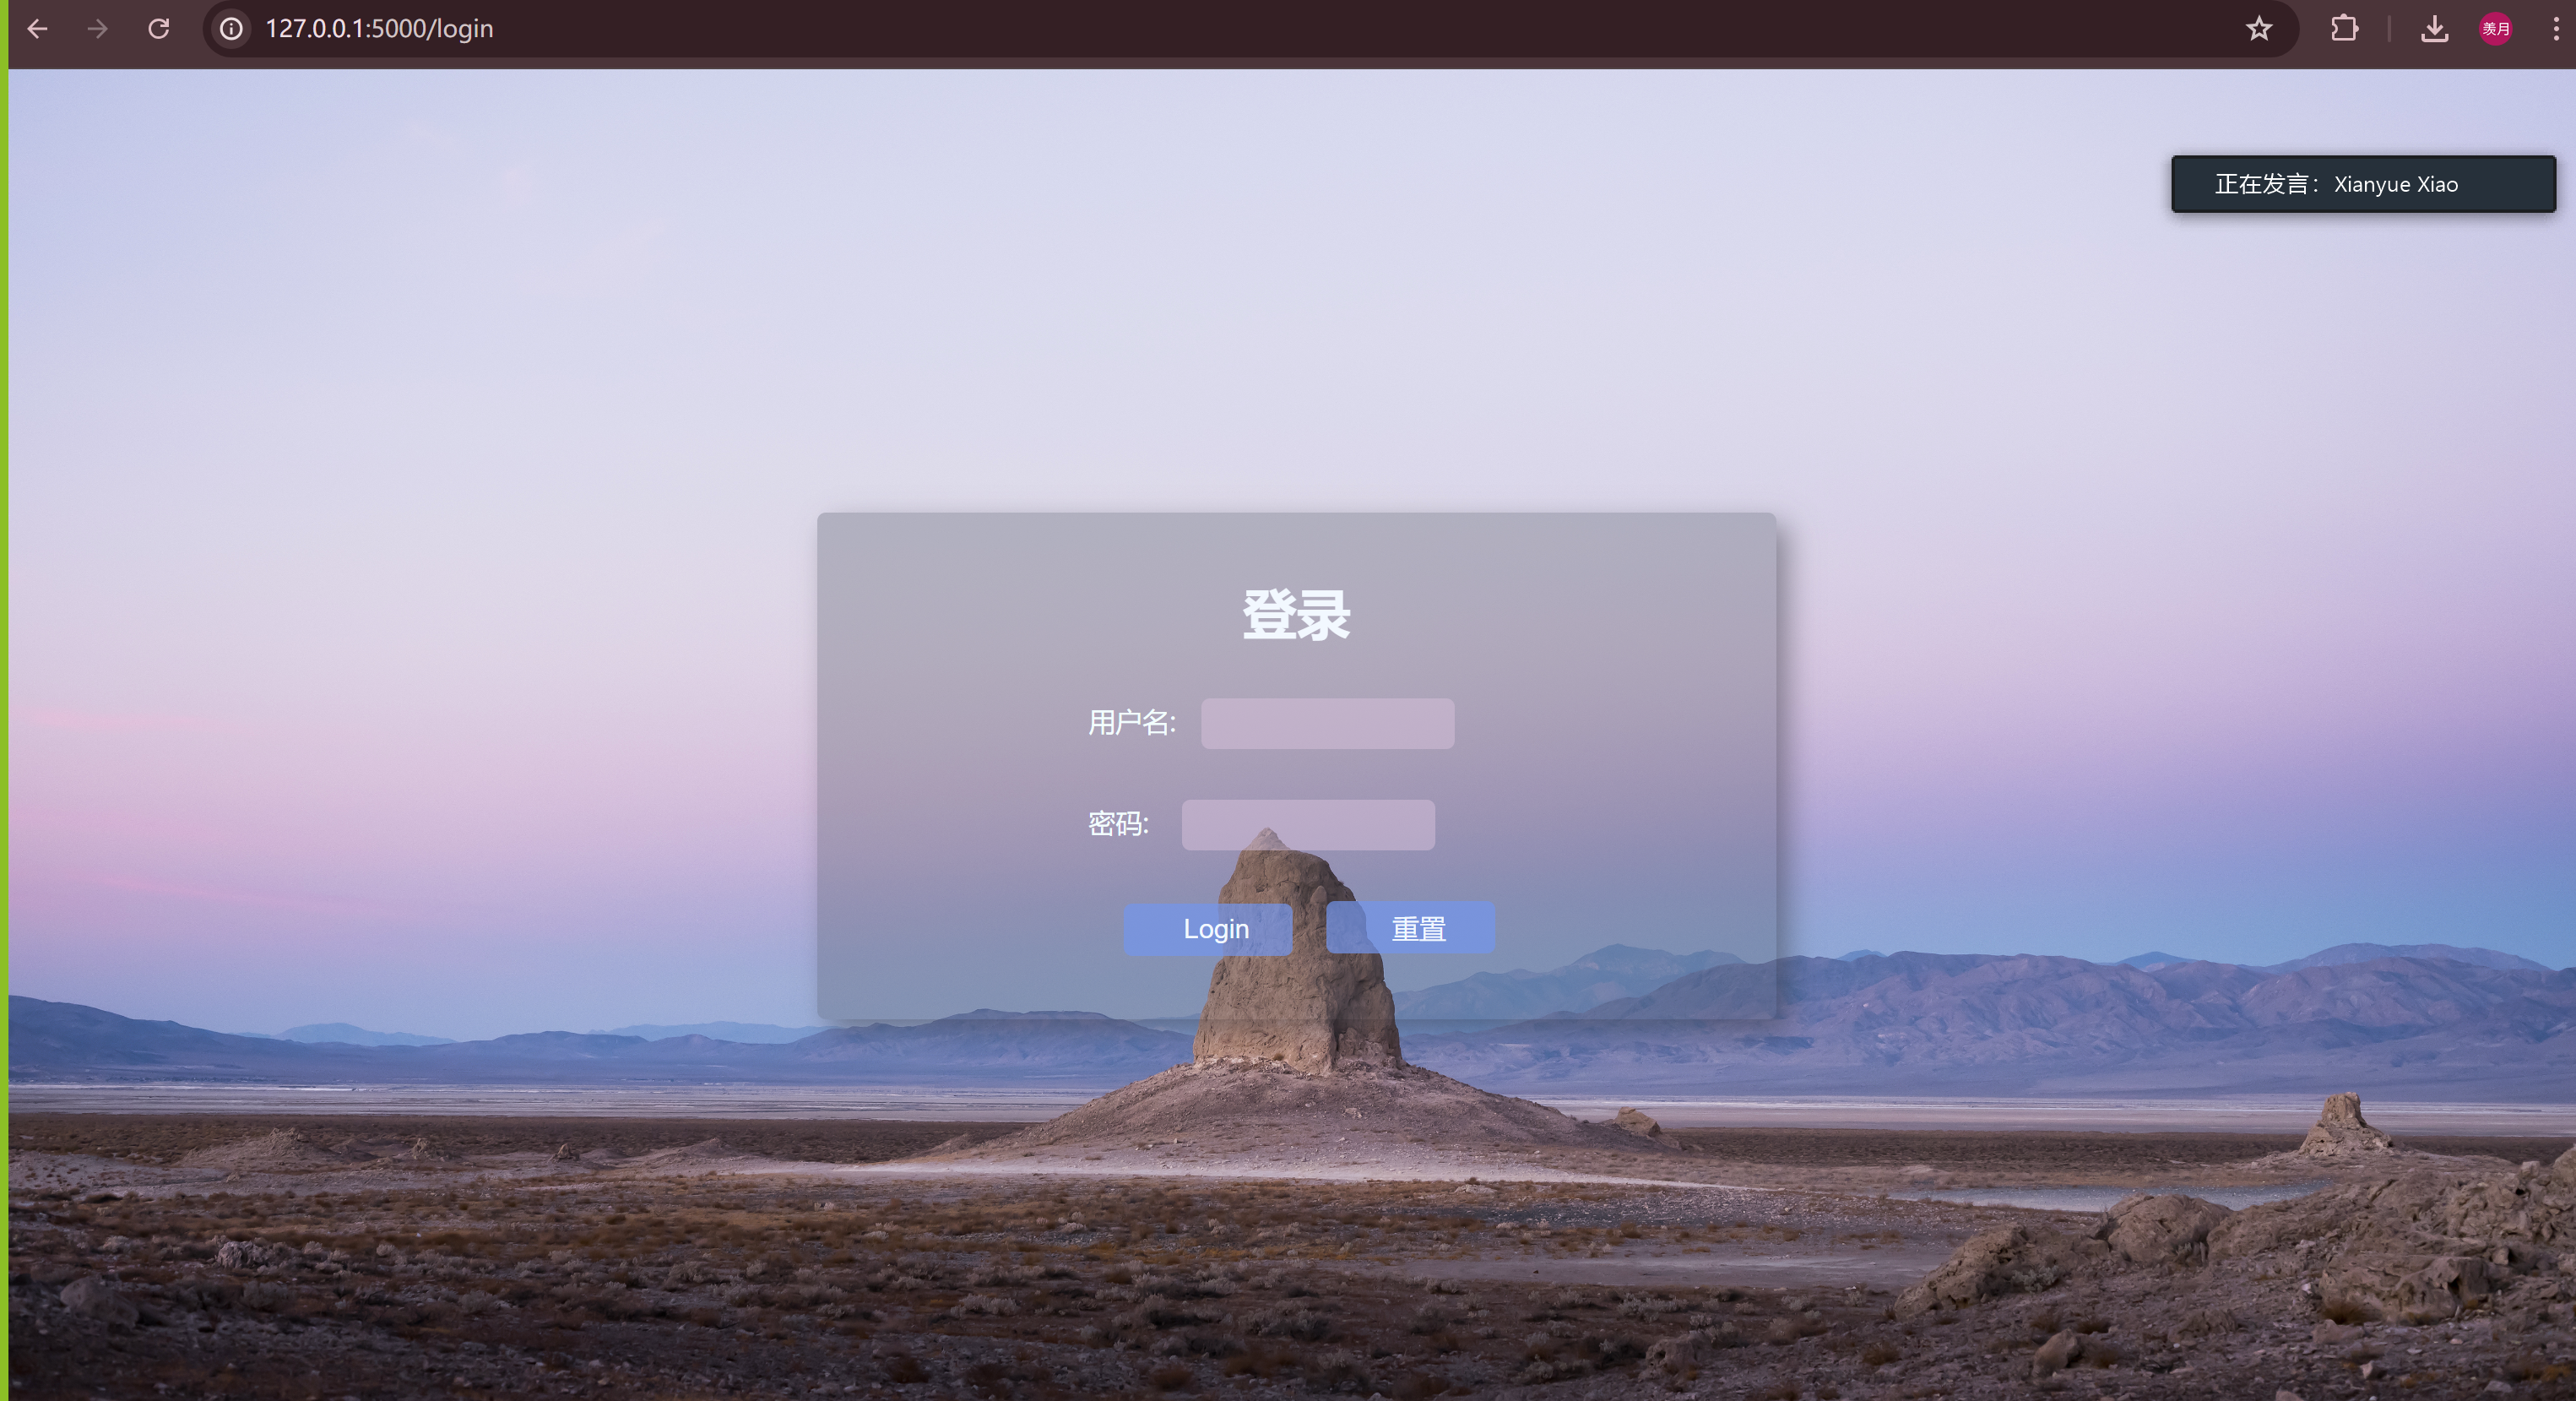
2.2 The Get-message inheritance class in the client's documentation.
class GetMessage(Client):
    def __init__(self, userName):
        super().__init__(userName=userName)
        self.messages=[]
        self.clientStart()
        self.publishGetAllMessage()

    def on_connect(self, client, userdata, flags, rc):  # 链接
        if rc == 0:
            print("Connected successfully")
            returnLogin = self.userName + "chatall"
            client.subscribe(returnLogin)  # 订阅 chatall 主题
        else:
            print("Failed to connect, return code %d\n", rc)

    def on_message(self, client, userdata, msg):  # 接受数据
        # 规定传入数据均为dict的形式

        messages = eval(msg.payload.decode('utf-8'))
        # 读取数据
        self.messages=messages #返回一个字典的列表,['id':id,'senderID':senderID,'message':message]存到类中
        print(messages)


    def publishGetAllMessage(self):
        returnTopic = self.userName + "chatall"
        # 数据发送特定格式
        data = {'userName': self.userName, 'returnTopic': returnTopic}
        # qos1
        self.client.publish("chatall", str(data).encode(), 1)
        # client.loop()
        print('发布信息 ', "chatall", ' 成功')
The functionality of this section has been described in the overall functional overview of client.
3. Technical skills of personal work (Personal Soft Skills)
This section introduces in detail the functions constructed and the skills and methods used by the author when implementing the code, which reflects the author's basic skills in developing the project and the overall understanding of the project code. This code has been integrated with the main code of the project and is ready to run, which fits the goals and ideas of the project.
3.1 app.py
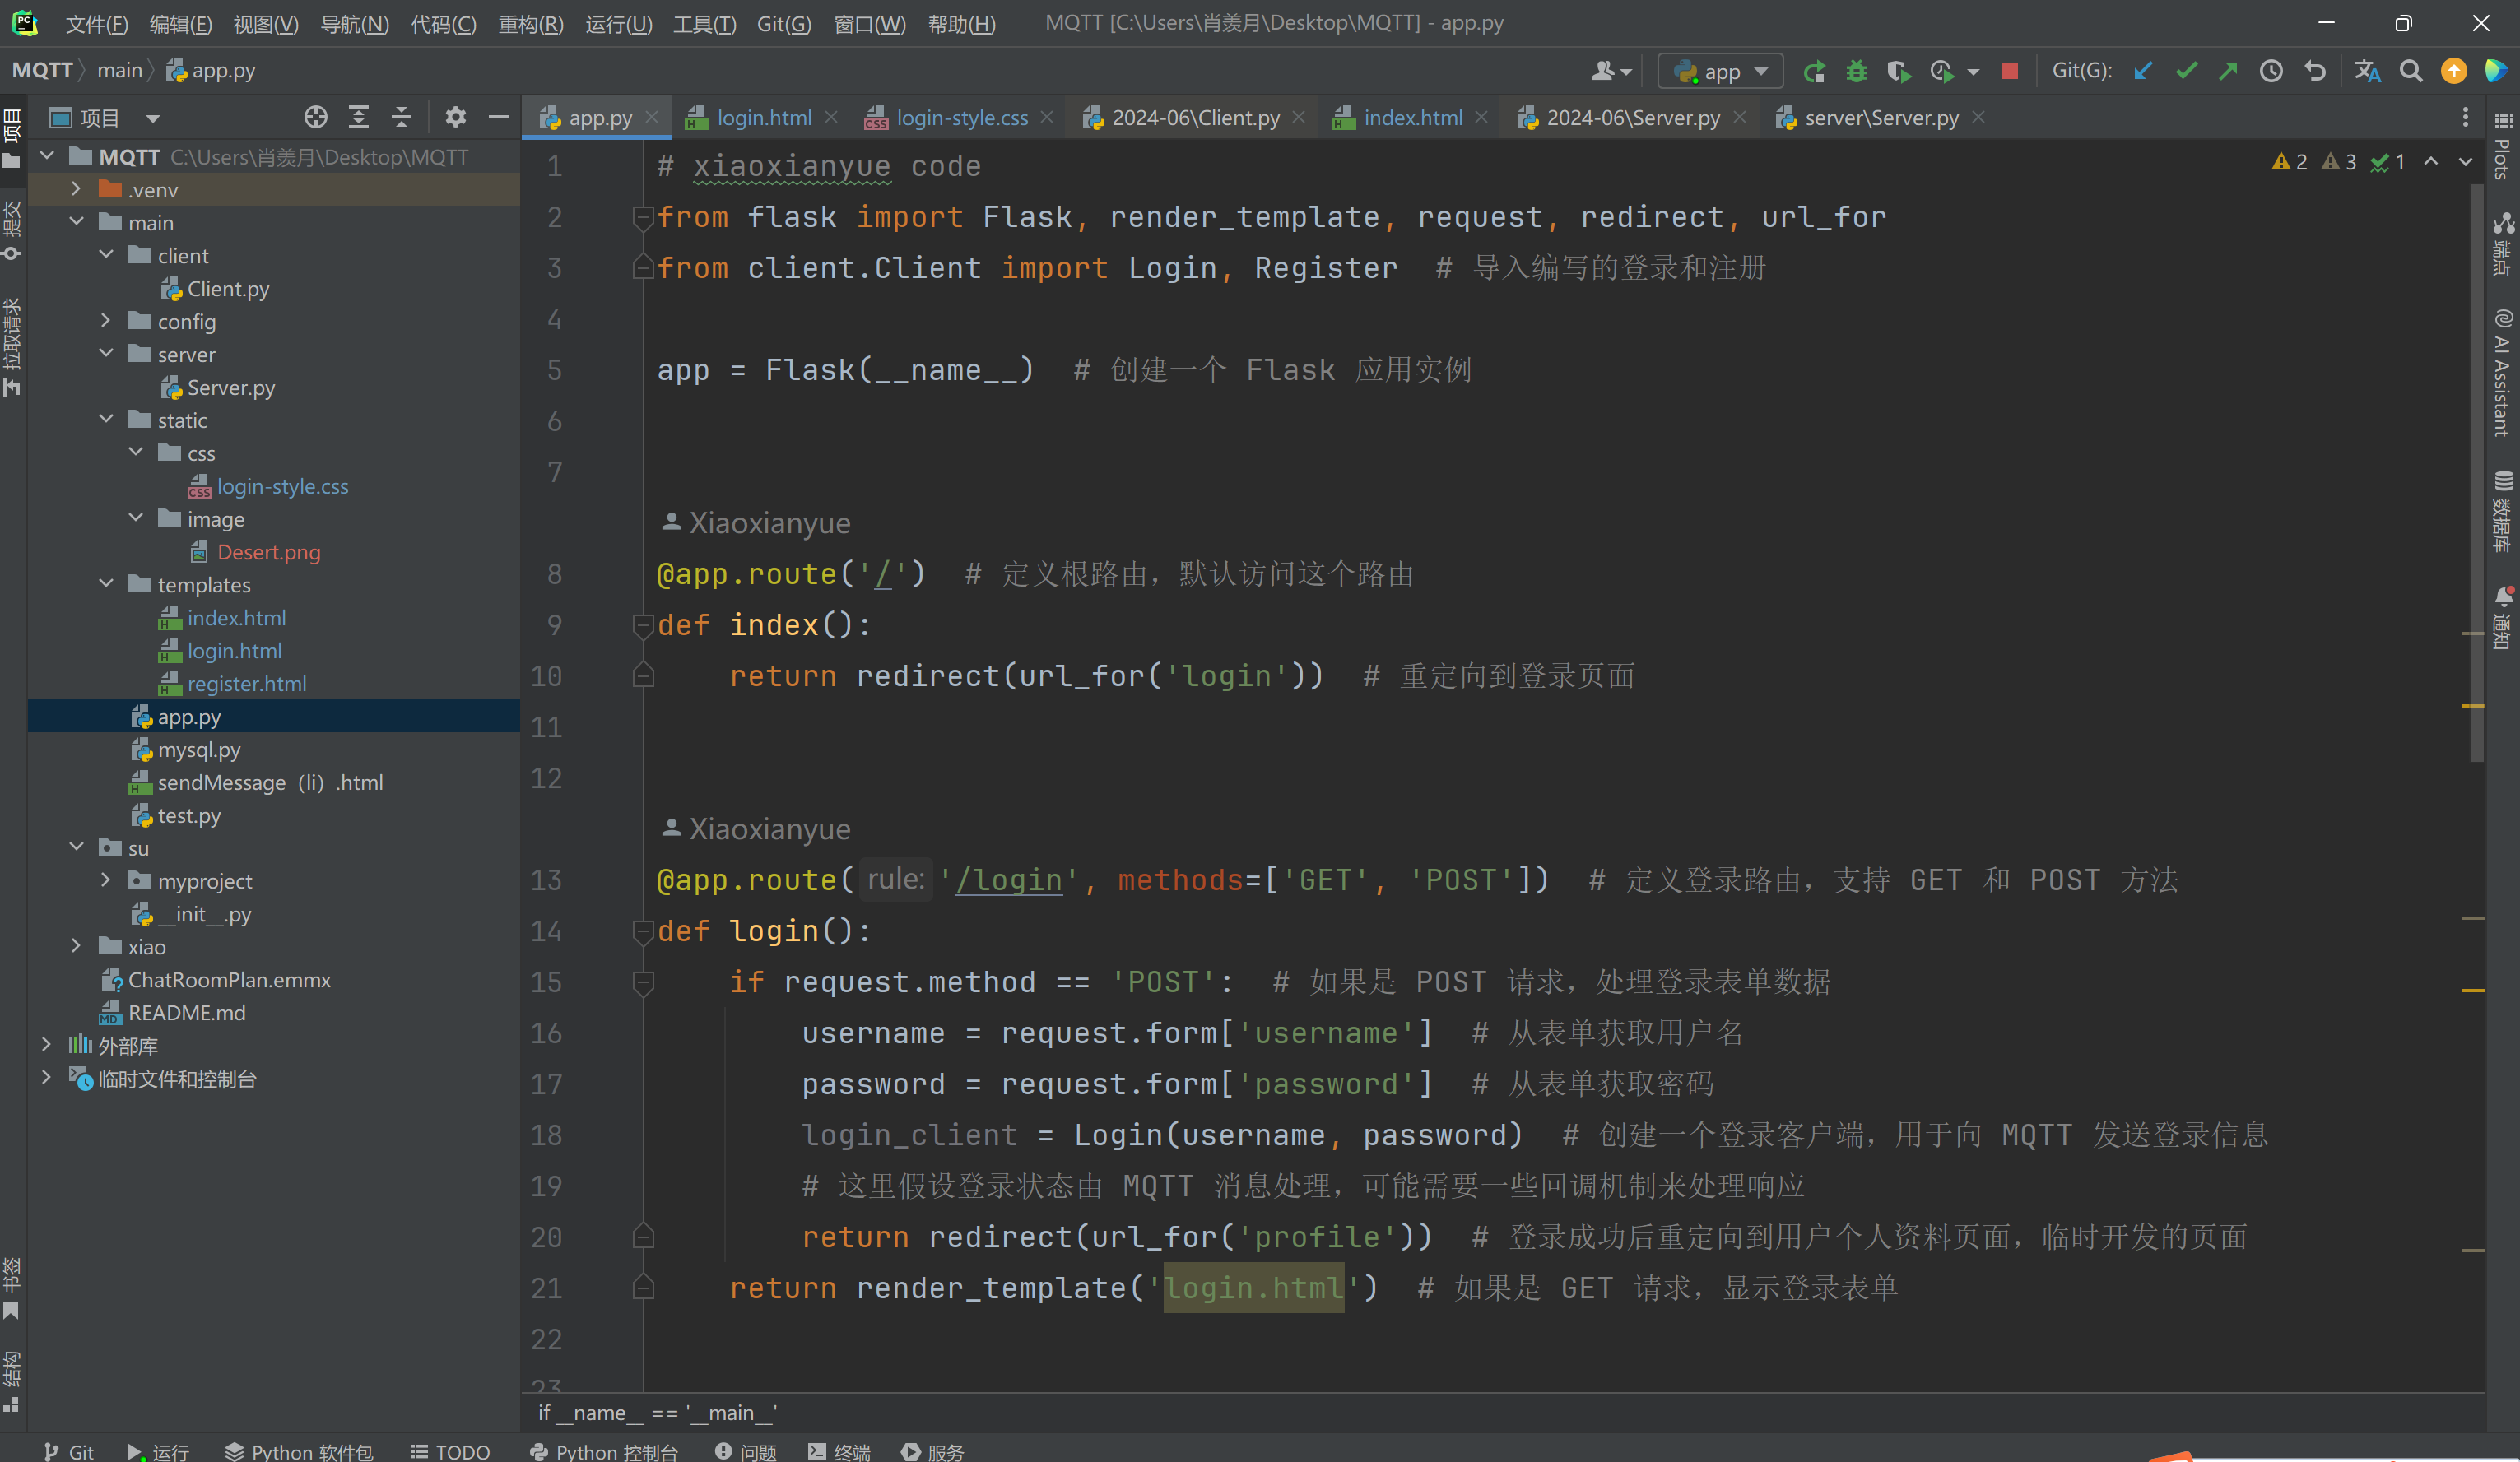
The app.py file mainly writes Flask code, including access URL rules, request patterns, and calls to the code interface in Client.py to realize the login and registration functions.
3.1.1 Explanation of the Flask Code
This code defines a simple web application using the Flask framework. It includes routes for user login, registration, and profile viewing. The application interacts with MQTT for authentication.
- Importing Necessary Libraries and Modules
from flask import Flask, render_template, request, redirect, url_for
from client.Client import Login, Register # Importing custom login and registration classes- Flask: The primary framework used to create the web application.
- render_template: To render HTML templates.
- request: To handle HTTP requests.
- redirect and url_for: To redirect users to different routes.
- Login and Register: Custom classes for handling login and registration via MQTT.
- Initializing the Flask Application
app = Flask(__name__) # Creating a Flask application instance- app: The Flask application instance.
- Defining Routes
- Root Route:
@app.route('/')  # Defining the root route
def index():
return redirect(url_for('login')) # Redirecting to the login page- Login Route:
@app.route('/login', methods=['GET', 'POST'])  # Defining the login route
def login():
    if request.method == 'POST':  # Handling POST requests
        username = request.form['username']  # Retrieving the username from the form
        password = request.form['password']  # Retrieving the password from the form
        login_client = Login(username, password)  # Creating a login client instance
        # Here, it is assumed that the login status is handled by MQTT message processing
        return redirect(url_for('profile'))  # Redirecting to the profile page upon successful login
return render_template('login.html') # Rendering the login template for GET requests- Register Route:
@app.route('/register', methods=['GET', 'POST'])  # Defining the register route
def register():
    if request.method == 'POST':  # Handling POST requests
        username = request.form['username']  # Retrieving the username from the form
        password = request.form['password']  # Retrieving the password from the form
        register_client = Register(username, password)  # Creating a registration client instance
        # Here, it is assumed that the registration status is handled similarly to login
        return redirect(url_for('login'))  # Redirecting to the login page upon successful registration
return render_template('register.html') # Rendering the registration template for GET requests- Profile Route:
@app.route('/profile')  # Defining the profile route
def profile():
    # Displaying user information; this section needs further development
return 'Welcome, user!' # Displaying a welcome message- Running the Application
if __name__ == '__main__':
    app.run(debug=True)  # Running the Flask application in debug mode
3.1.2 Summary of Features And Skills
User Authentication:
- Login: Handles user login via a POST request. Uses an instance of the
Loginclass to send login information via MQTT. - Registration: Handles user registration via a POST request. Uses an instance of the
Registerclass to send registration information via MQTT.
- Login: Handles user login via a POST request. Uses an instance of the
Redirection:
- Users are redirected to appropriate routes (
login,profile) based on the context.
- Users are redirected to appropriate routes (
Rendering Templates:
- Uses
render_templateto render HTML templates for login and registration forms.
- Uses
Handling HTTP Requests:
- Uses
request.methodto differentiate between GET and POST requests. - Retrieves form data using
request.form.
- Uses
Routing:
- Defines multiple routes (
/,/login,/register,/profile) to handle different parts of the application.
- Defines multiple routes (
Overall, this code sets up a basic web application with login and registration functionality, leveraging MQTT for communication and Flask for the web framework.
3.2 login.html
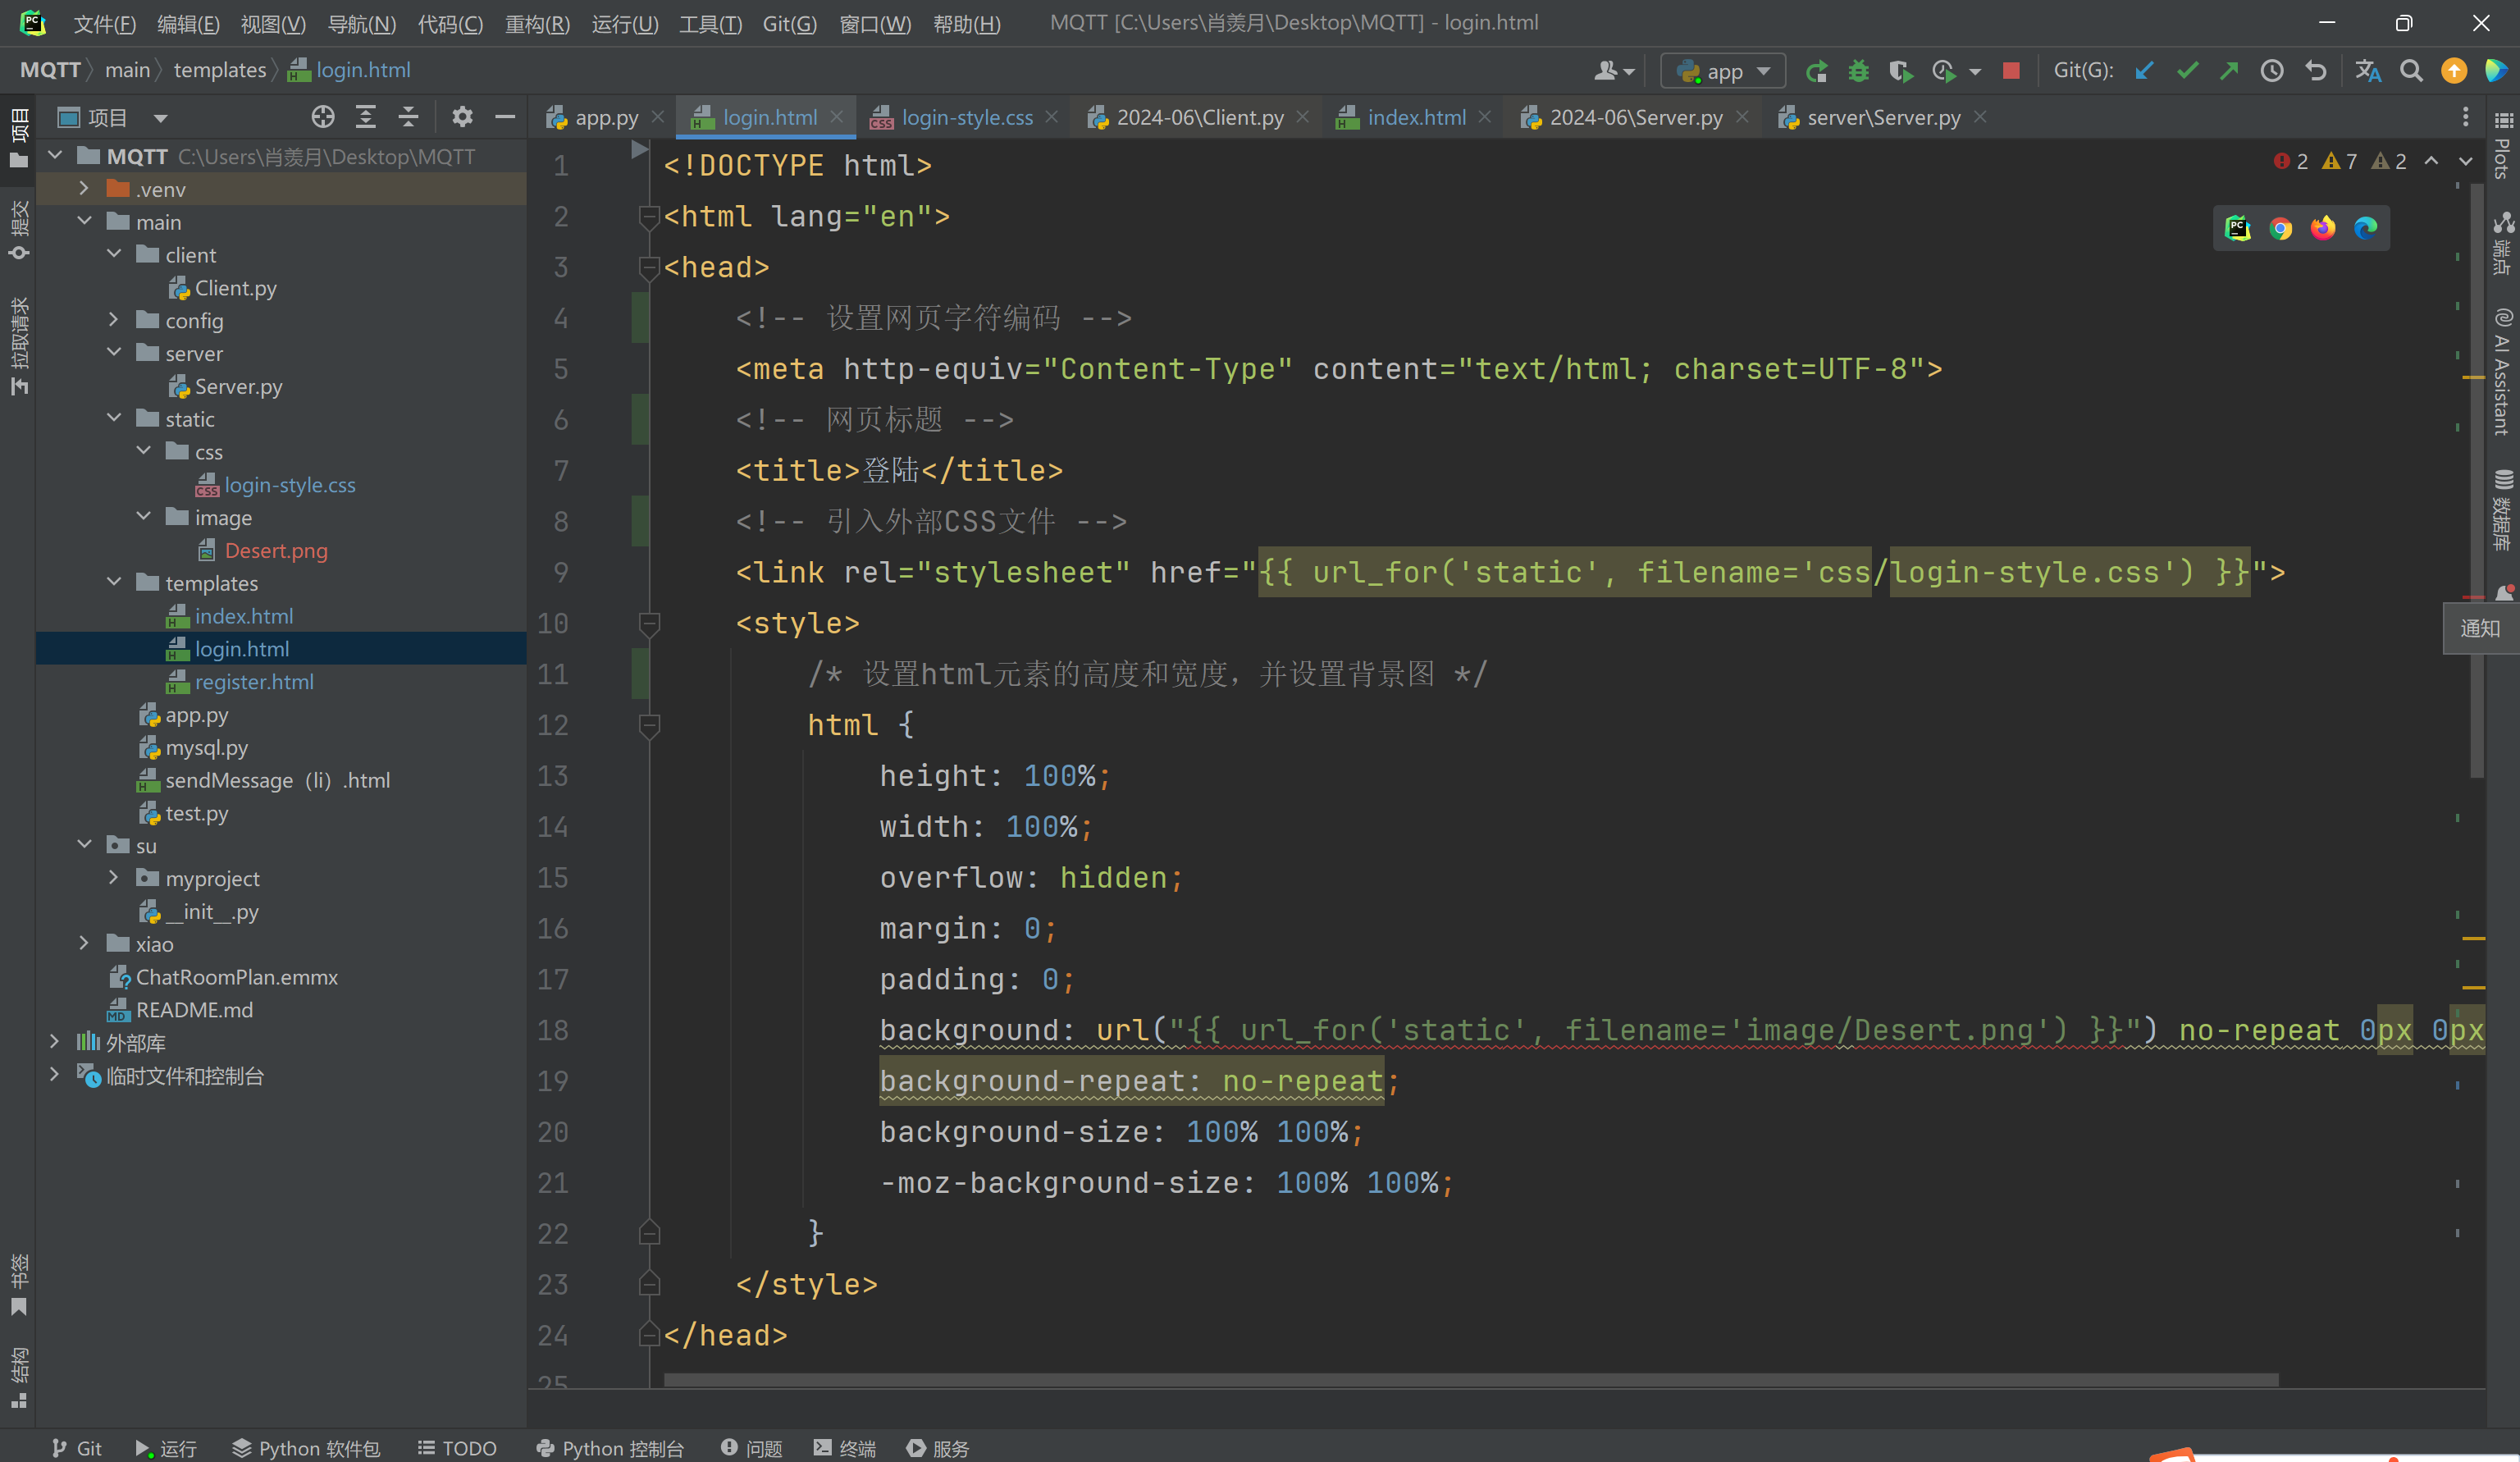
This package implements the login screen in html.
3.2.1 Methods and Techniques Used
HTML Document Structure:
- The code is structured as a standard HTML document with a
<!DOCTYPE html>declaration,<html>,<head>, and<body>tags.
- The code is structured as a standard HTML document with a
Meta Tag:
<meta http-equiv="Content-Type" content="text/html; charset=UTF-8">: This tag sets the character encoding for the webpage to UTF-8, ensuring that the text is displayed correctly in various languages.
Title Tag:
<title>登陆</title>: Sets the title of the webpage to "登录" (Login).
Linking External CSS:
<link rel="stylesheet" href="{{ url_for('static', filename='css/login-style.css') }}">: Links an external CSS file for styling the webpage. Theurl_forfunction dynamically generates the URL for the CSS file, ensuring it is correctly linked.
Inline CSS Styling:
- The
<style>block within the<head>tag contains CSS rules that set the background image of the HTML element. This includes:- Setting the height and width to 100% to cover the entire viewport.
- Hiding overflow to prevent scrolling.
- Removing margins and padding.
- Setting a background image (
Desert.png) with no-repeat and covering the entire background usingbackground-size: 100% 100%.
- The
Form and Input Elements:
- The
<form>element is used to create a form for user login, using the POST method. - The form includes input fields for username and password:
<input name="username" id="username" type="text">: Text input for the username.<input name="password" id="password" type="password">: Password input for the password.
- Labels (
<label>) are included next to the input fields for potential validation messages.
- The
Buttons:
- Two buttons are included within the form:
<input type="submit" class="button" value="Login">: A submit button labeled "Login" that submits the form.<input type="reset" class="button" value="重置">: A reset button labeled "重置" (Reset) that resets the form fields to their initial values.
- Two buttons are included within the form:
Dynamic Resource Referencing:
- The use of
{{ url_for('static', filename='...') }}ensures that URLs for static files (CSS and images) are dynamically generated by the web framework (commonly Flask), making the paths to these resources correct and avoiding hardcoding URLs.
- The use of
3.2.2 Functionality
- User Interface for Login: The provided HTML code creates a user interface for a login page where users can enter their username and password.
- Styling and Background: The page includes styling to set a background image and adjust the appearance of the form elements.
- Form Submission: When the user clicks the "Login" button, the form data (username and password) is sent to the server using the POST method. The server can then process this data for authentication.
- Form Reset: The "Reset" button allows users to clear the input fields and reset the form to its initial state.
Overall, the code sets up a basic but visually styled login page that can be integrated with a backend for user authentication.
3.3 login-style.css
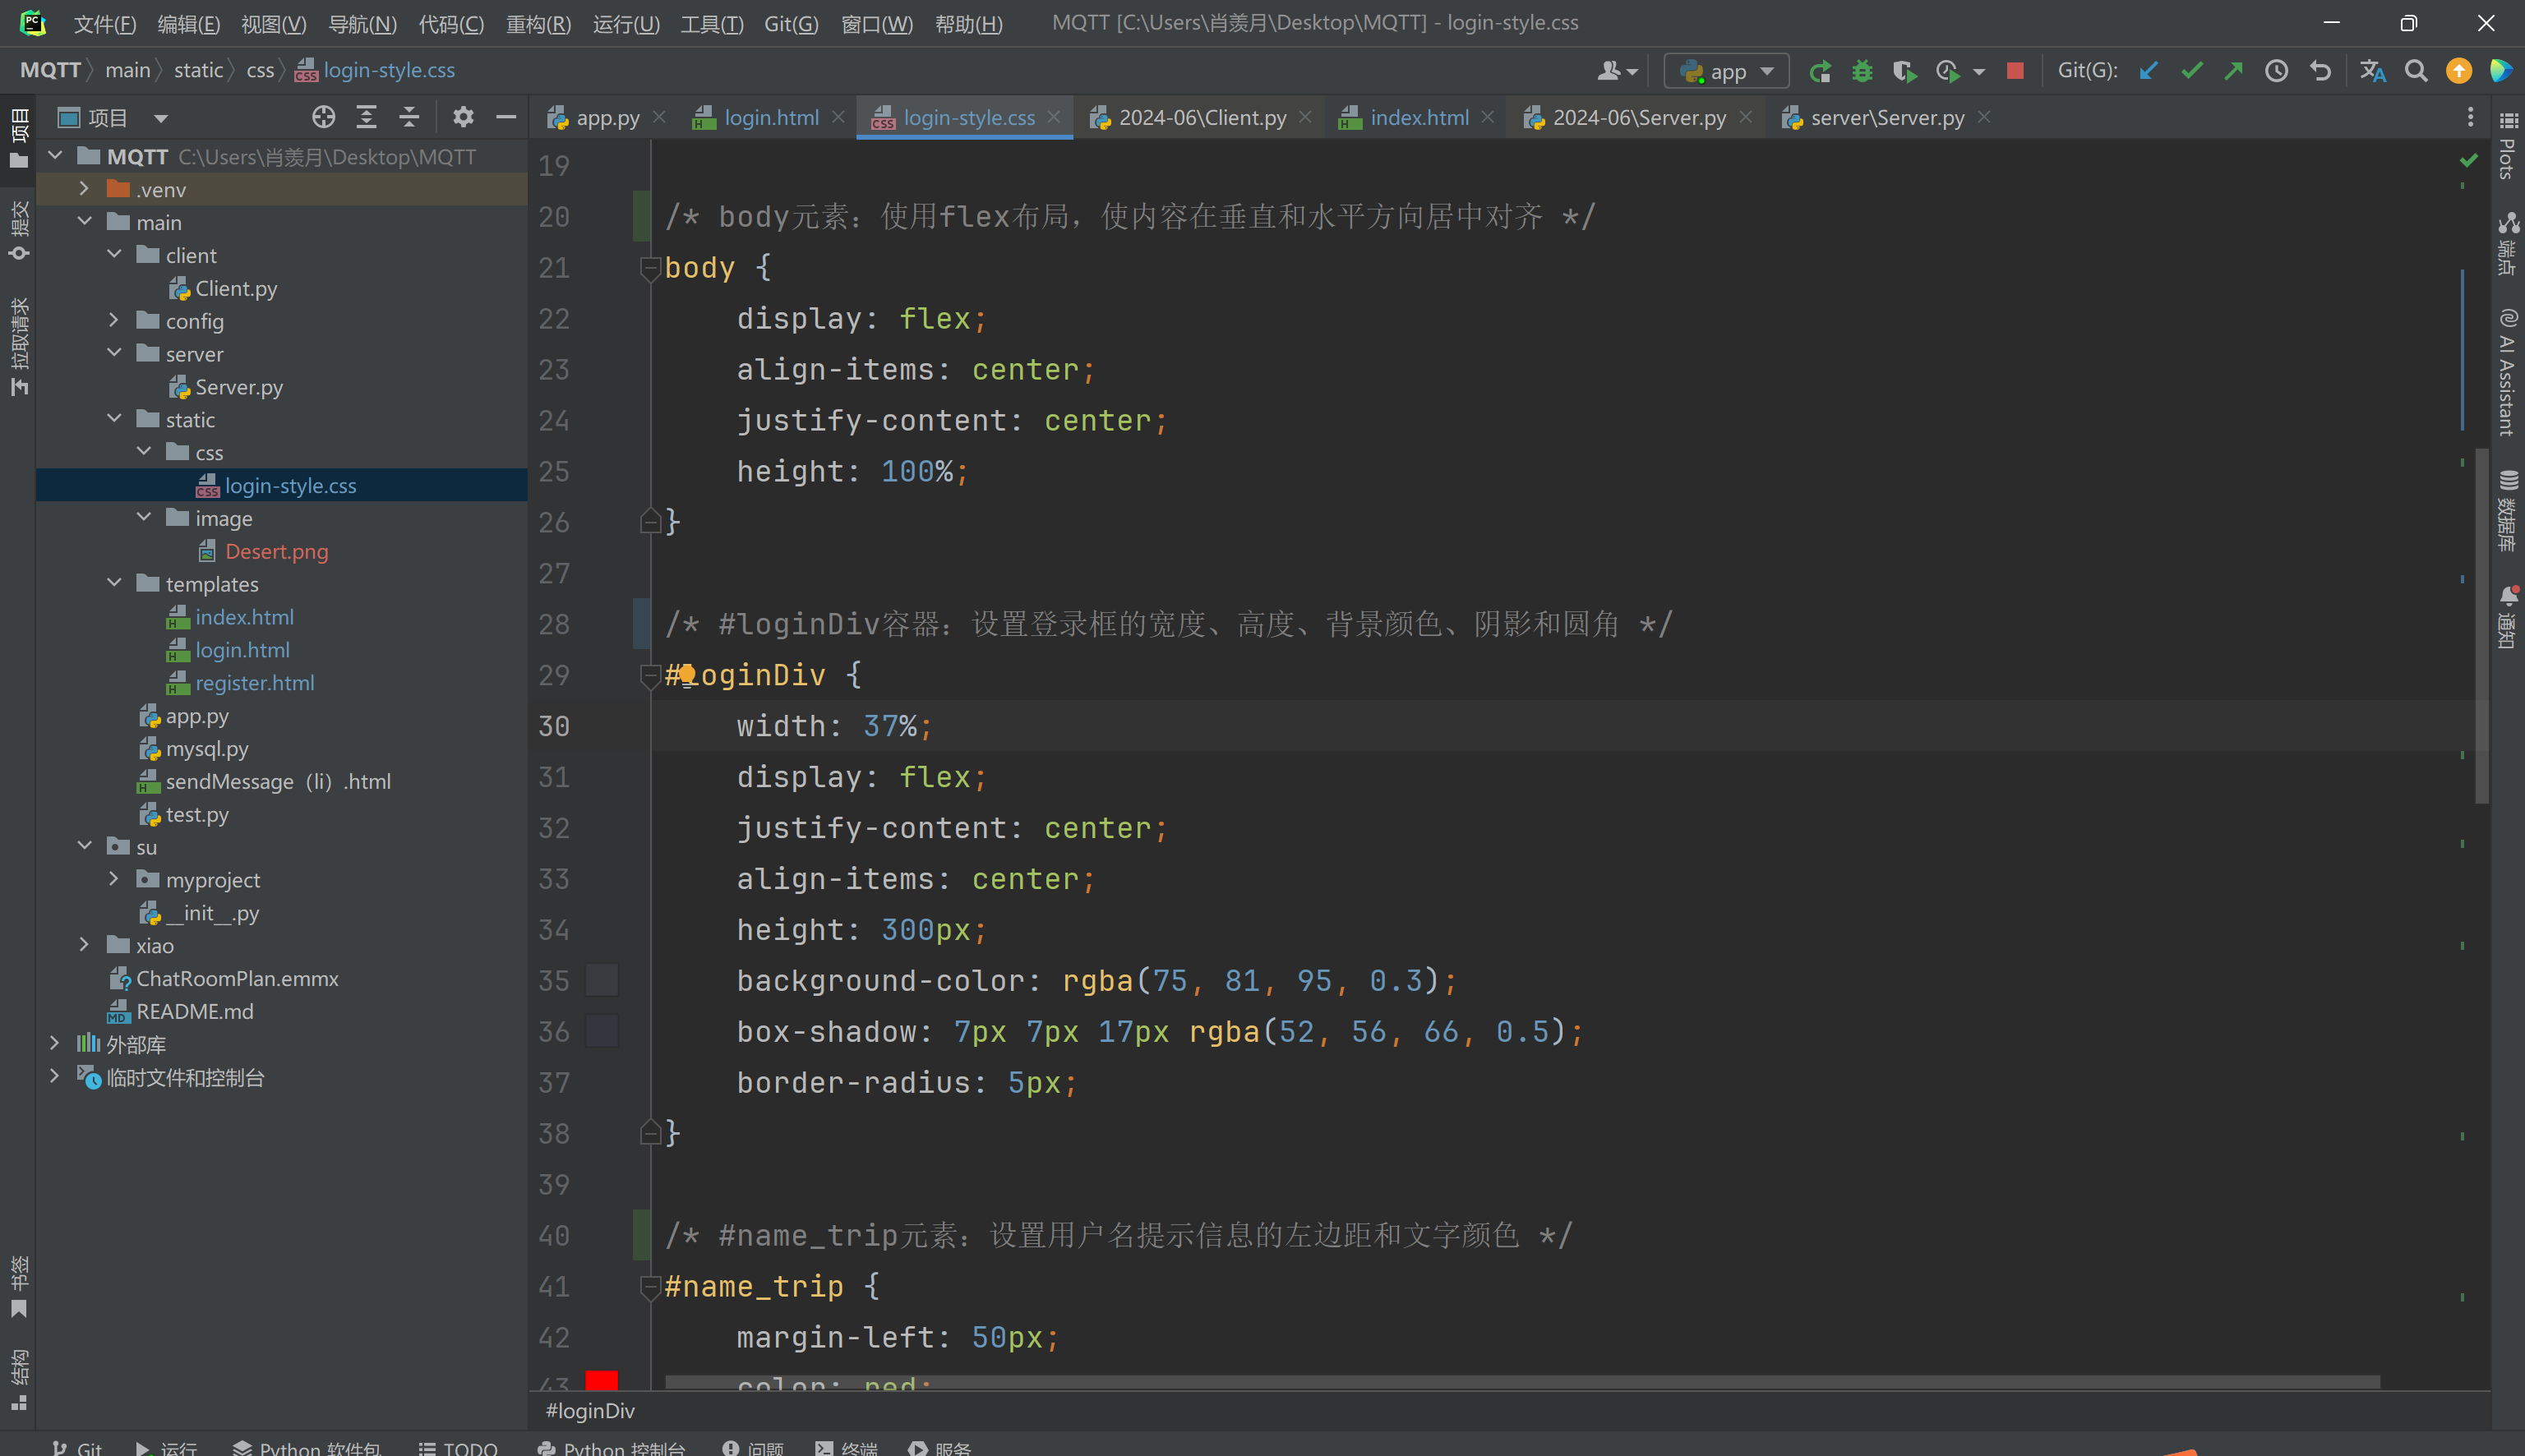
This file package completes the optimization of the login screen. If login.html is the framework of the login page, then login-style is the clothes on the skeleton.
3.3.1 Explanation of the CSS Code
The provided CSS code defines the styling for a login page, ensuring a visually appealing and user-friendly interface. Below is an explanation of each section, including the methods used and their functions.
- Global Reset
* {
    margin: 0;
    padding: 0;
}- Method: Universal Selector (
*) - Function: Removes all default margin and padding from all HTML elements, creating a clean slate for custom styling.
- Body Styling
body {
    display: flex;
    align-items: center;
    justify-content: center;
    height: 100%;
}- Method: Flexbox Layout (
display: flex) - Function: Centers the content both vertically and horizontally within the viewport by using Flexbox properties (
align-itemsandjustify-content).
- Login Container Styling
#loginDiv {
    width: 37%;
    display: flex;
    justify-content: center;
    align-items: center;
    height: 300px;
    background-color: rgba(75, 81, 95, 0.3);
    box-shadow: 7px 7px 17px rgba(52, 56, 66, 0.5);
    border-radius: 5px;
}- Method: ID Selector (
#loginDiv) and Flexbox Layout - Function: Styles the login container (
#loginDiv) with:- Fixed width and height for consistent sizing.
- Centered content using Flexbox properties.
- Semi-transparent background color using
rgba. - Shadow effect using
box-shadowfor a 3D appearance. - Rounded corners using
border-radius.
- Username Tip Styling
#name_trip {
    margin-left: 50px;
    color: red;
}- Method: ID Selector (
#name_trip) - Function: Styles the username tip with:
- Left margin to position it appropriately.
- Red text color to highlight warnings or important information.
- Paragraph Styling
p {
    margin-top: 30px;
    margin-left: 20px;
    color: azure;
}- Method: Element Selector (
p) - Function: Styles paragraphs (
<p>) with:- Top margin to space out each paragraph.
- Left margin for indentation.
- Azure text color for readability against the background.
- Input Styling
input {
    margin-left: 15px;
    border-radius: 5px;
    border-style: hidden;
    height: 30px;
    width: 140px;
    background-color: rgba(216, 191, 216, 0.5);
    outline: none;
    color: #f0edf3;
    padding-left: 10px;
}- Method: Element Selector (
input) - Function: Styles input fields (
<input>) with:- Left margin for spacing.
- Rounded corners using
border-radius. - Hidden borders using
border-style. - Fixed height and width for consistency.
- Semi-transparent background color using
rgba. - No outline on focus using
outline: none. - Light text color for readability.
- Left padding for inner spacing.
- Button Styling
.button {
    border-color: cornsilk;
    background-color: rgba(100, 149, 237, .7);
    color: aliceblue;
    border-style: hidden;
    border-radius: 5px;
    width: 100px;
    height: 31px;
    font-size: 16px;
}- Method: Class Selector (
.button) - Function: Styles buttons (
<input class="button">) with:- Hidden borders using
border-style. - Rounded corners using
border-radius. - Semi-transparent background color using
rgba. - Light text color for contrast.
- Fixed width and height for consistency.
- Larger font size for better readability.
- Hidden borders using
3.3.2 Summary
The CSS code uses various selectors and properties to create a cohesive and visually appealing login page:
- Universal Selector: Resets all margins and paddings.
- Flexbox: Centers content within the body.
- ID and Class Selectors: Apply specific styles to elements such as the login container, username tip, input fields, and buttons.
- RGBA Colors: Provides semi-transparent backgrounds.
- Box Shadow and Border Radius: Adds depth and rounded corners for modern design.
These methods collectively ensure that the login page is well-structured, user-friendly, and visually engaging.
3.4 register
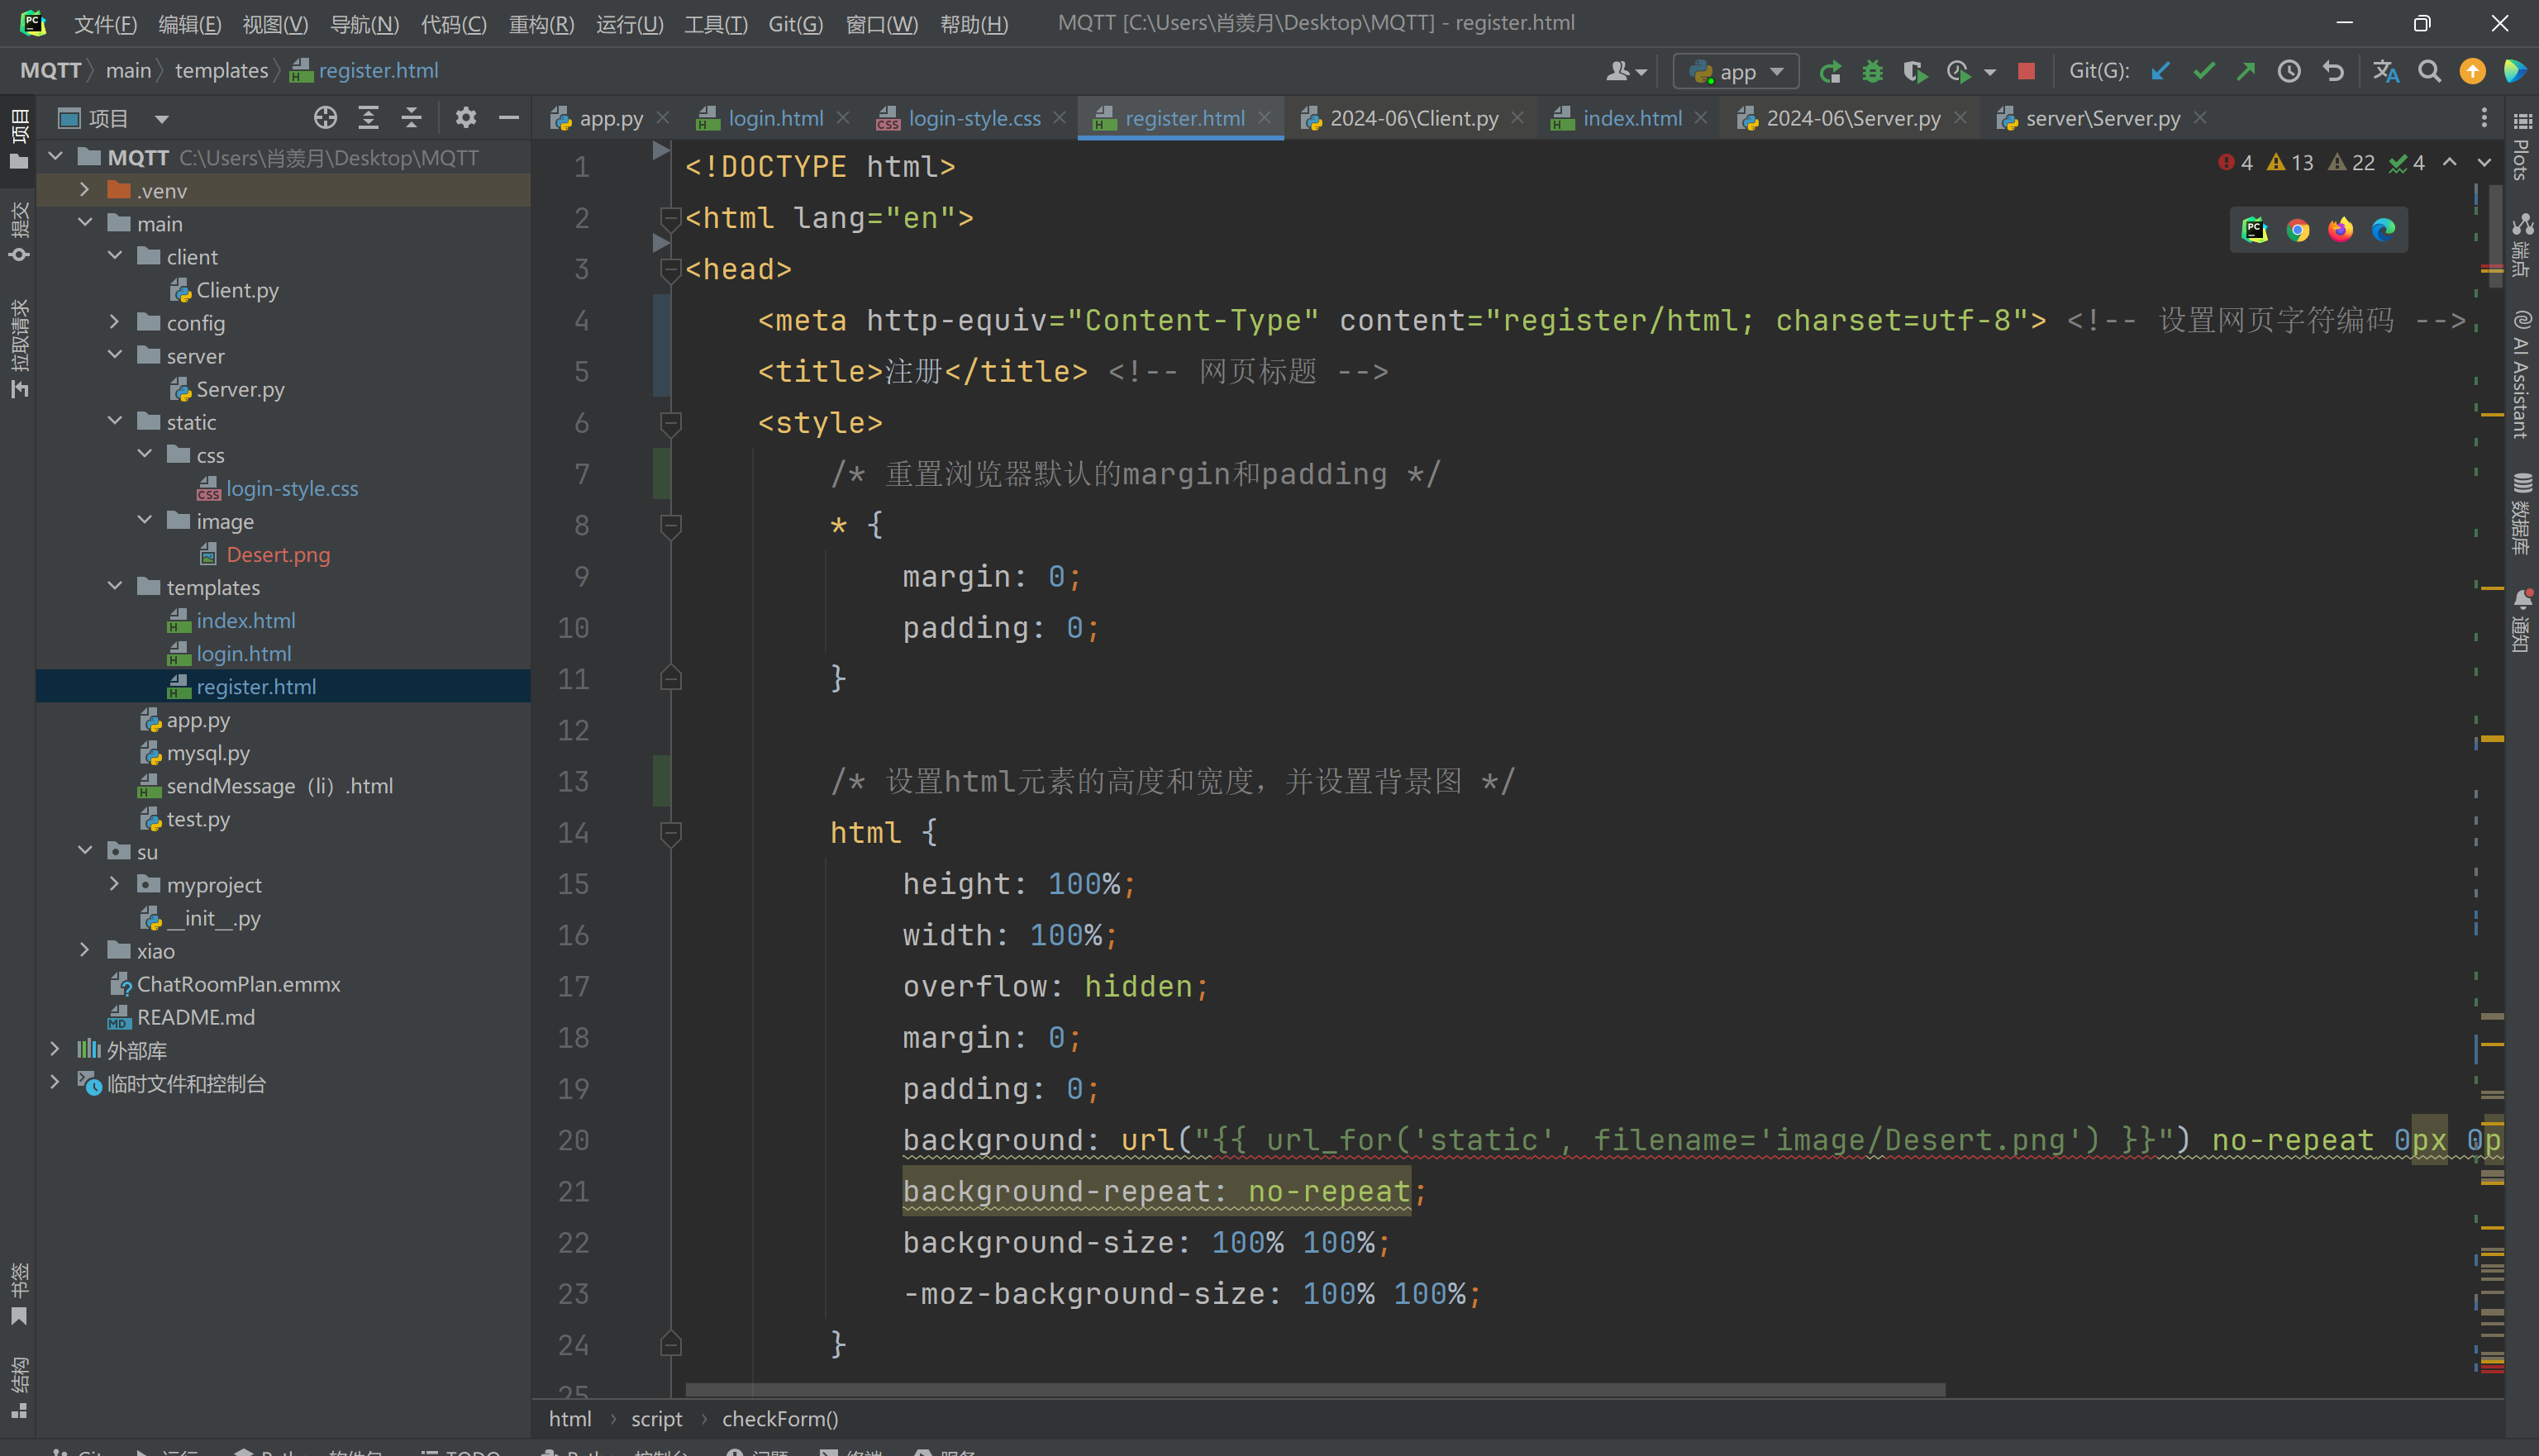
This HTML, CSS, and JavaScript code provides a registration form, including basic form validation functionalities. Here’s an explanation of the methods used and the functionalities they implement:
3.4.1 HTML Section
DOCTYPE Declaration:
<!DOCTYPE html>Declares the document type as HTML5.
Meta Tag:
<meta http-equiv="Content-Type" content="register/html; charset=utf-8">Sets the webpage's character encoding to UTF-8.
Title:
<title>注册</title>Sets the webpage's title to "Registration".
Form:
<form action="">Defines a form for user input for registration.
Input Fields and Buttons:
<p>用户姓名:<input id="userNname" name="username" type="text" autofocus required><label id="name_trip"></label></p>
<p>用户密码:<input id="password" type="password" name="password" required><label id="password_trip"></label></p>
<p style="text-align: center;">
    <input type="submit" class="button" value="Register">
    <input type="reset" class="button" value="重置">
</p>
Includes input fields for username and password, along with "Register" and "Reset" buttons.
3.4.2 CSS Section
Global Reset:
* {
    margin: 0;
    padding: 0;
}
Removes default margin and padding from all elements.
Background Image:
html {
    height: 100%;
    width: 100%;
    overflow: hidden;
    margin: 0;
    padding: 0;
    background: url("{{ url_for('static', filename='image/Desert.png') }}") no-repeat 0px 0px;
    background-repeat: no-repeat;
    background-size: 100% 100%;
    -moz-background-size: 100% 100%;
}
Sets the background image for the
htmlelement.Body Flexbox Layout:
body {
    display: flex;
    align-items: center;
    justify-content: center;
    height: 100%;
}
Uses flexbox layout to center content both vertically and horizontally.
Login Box Styling:
#loginDiv {
    width: 37%;
    display: flex;
    justify-content: center;
    align-items: center;
    height: 650px;
    background-color: rgba(75, 81, 95, 0.3);
    box-shadow: 7px 7px 17px rgba(52, 56, 66, 0.5);
    border-radius: 5px;
}
Styles the login box, setting its width, height, background color, shadow, and border radius.
Input and Button Styling:
input,
select {
    margin-left: 15px;
    border-radius: 5px;
    border-style: hidden;
    height: 30px;
    width: 140px;
    background-color: rgba(216, 191, 216, 0.5);
    outline: none;
    color: #f0edf3;
    padding-left: 10px;
}

.button {
    border-color: cornsilk;
    background-color: rgba(100, 149, 237, .7);
    color: aliceblue;
    border-style: hidden;
    border-radius: 5px;
    width: 100px;
    height: 31px;
    font-size: 16px;
}
Styles the input fields and buttons, including padding, border-radius, background color, border style, and text color.
3.4.3 JavaScript Section
Tooltip Function:
function trip(obj, trip) {
    document.getElementById(obj).innerHTML = "<b>" + trip + "</b>";
}
Displays a tooltip message.
Form Validation Functions:
function checkSex() {
    var sexNum = document.getElementsByName("sex");
    var sex = "";
    for (let i = 0; i < sexNum.length; ++i) {
        if (sexNum[i].checked) {
            sex = sexNum[i];
        }
    }
    if (sex == "") {
        trip("sex_trip", "ERROR!!");
        return false;
    } else {
        trip("sex_trip", "OK!!");
    }
}

function checkHobby() {
    var hobbyNum = document.getElementsByName("hobby");
    var hobby = "";
    for (let i = 0; i < hobbyNum.length; ++i) {
        if (hobbyNum[i].checked) {
            hobby = hobbyNum[i];
        }
    }
    if (hobby == "") {
        trip("hobby_trip", "ERROR!!");
        return false;
    } else {
        trip("hobby_trip", "OK!!");
    }
}

function checkSelect() {
    var myselect = document.getElementById("userType");
    var index = myselect.selectedIndex;
    var checkValue = myselect.options[index].value;
    if (checkValue == 0) {
        trip("type_trip", "请选择!!");
        return false;
    } else {
        trip("type_trip", "OK!!");
    }
}

function checkForm() {
    checkSelect();
    checkHobby();
    checkSex();

    var trip = document.getElementsByName("em");
    var tripV = trip.innerHTML();

    var userNname = document.getElementById("userNname");
    var uName = userNname.value;
    if (uName.length < 1 || uName.length > 10) {
        trip("name_trip", "账号长度为1-10位!!");
        return false;
    } else {
        trip("name_trip", "OK!!");
    }

    var password = document.getElementById("password");
    var userPass = password.value;
    if (userPass.length < 6) {
        trip("password_trip", "密码要>6位!!");
        return false;
    } else {
        trip("password_trip", "OK!!");
    }

    var surePassword = document.getElementById("surePassword");
    var surePass = surePassword.value;
    if (userPass != surePass) {
        trip("surePassword_trip", "两次密码不一致!!");
        return false;
    } else {
        trip("surePassword_trip", "OK!!");
    }
}
Implements validation logic for gender, hobbies, user type, username, password, and confirm password fields, displaying appropriate messages.
3.4.4 Summary
This code implements a registration page with a form for user input, enhanced by CSS for styling and JavaScript for client-side validation. HTML is used for structuring the form, CSS for styling elements and ensuring a responsive design, and JavaScript for validating user input to ensure it meets predefined criteria before submission.
Discussion
Discussion of Result:
During the code writing process, the integration of the written code into the main body code requires a detailed reading of the logical functionality of the group member's code. In the process, the authors learned to think and use MQTT. In the process of writing web pages, the author mastered the development of front-end code using Flask and Django as the back-end, and developed web pages with aesthetics based on the structure of a simple web page.
Future Recommendations:
Try more features such as member account and non-member account (need to add new inheritance classes in sever and client), to further deepen the use of MQTT and improve the ability to manage the code.
Research Limitations:
The code doesn't make the login-registration conversion icon on the page, instead you have to switch between login and registration by changing the URL directly.
Result
Has been showed in ->
Brief summary of individual work results ->
2.1 The results of running the former function.
Project Management
The summary overview of the current status:
The main part can run normally, the sever and the client can pass messages to each other, the database can store the client information, the web pages can be merged, and the information in the database can be shared between the parts through the sever.
Gantt chart:

Reference:
https://github.coventry.ac.uk/suz19/MQTT
Appendix
Logbook:
https://fafl00pjf2.feishu.cn/docx/A5pHdLuQcoJ3FYxb5iQc5XkJn7b?from=from_copylink
Flowchart:
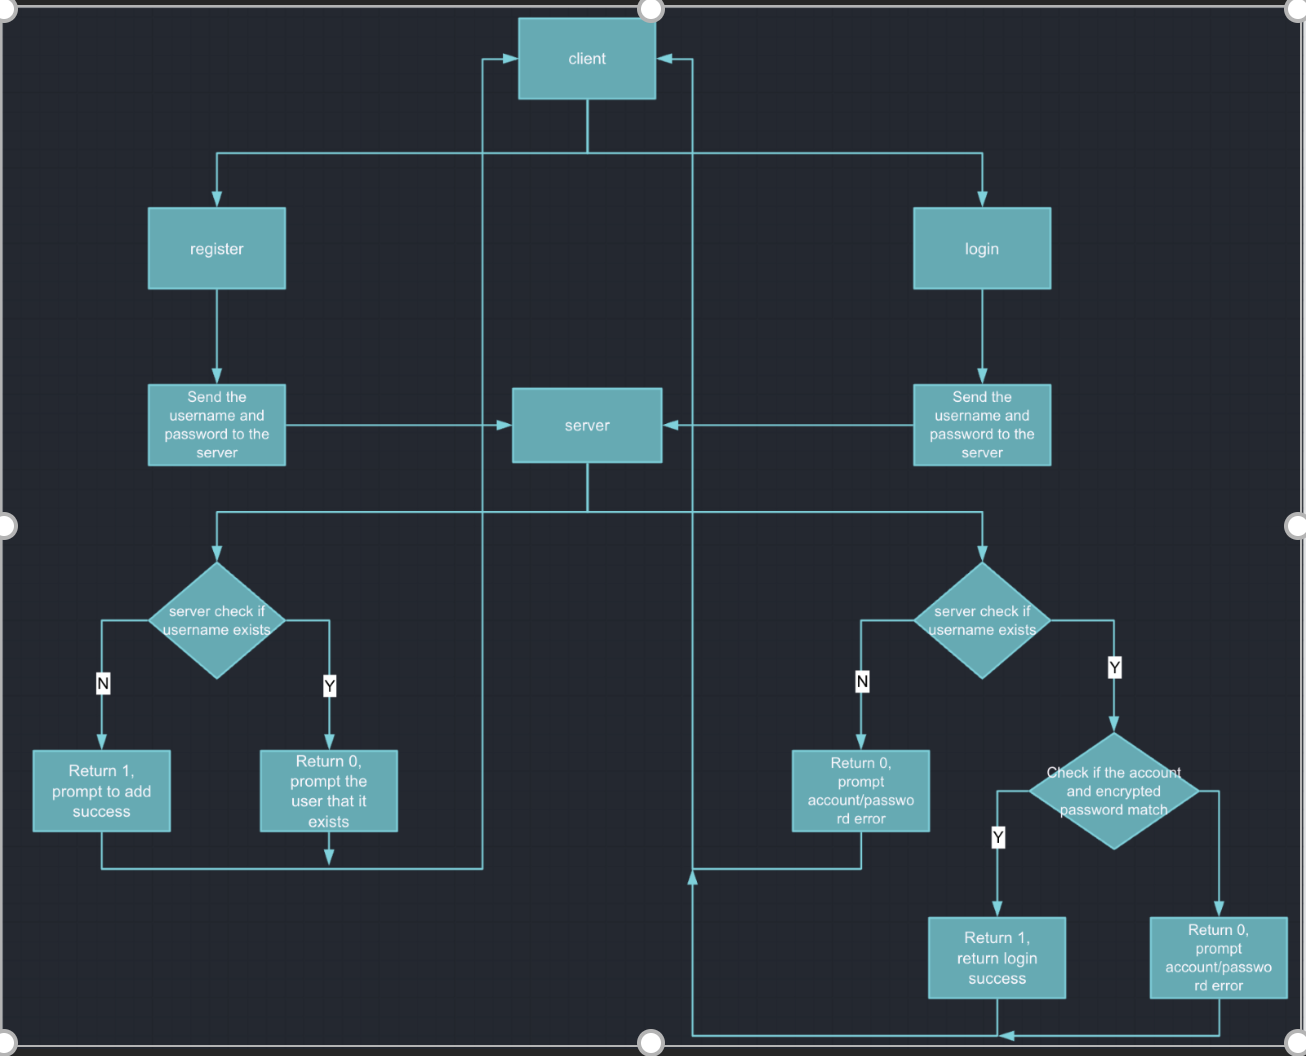
Use Interface:
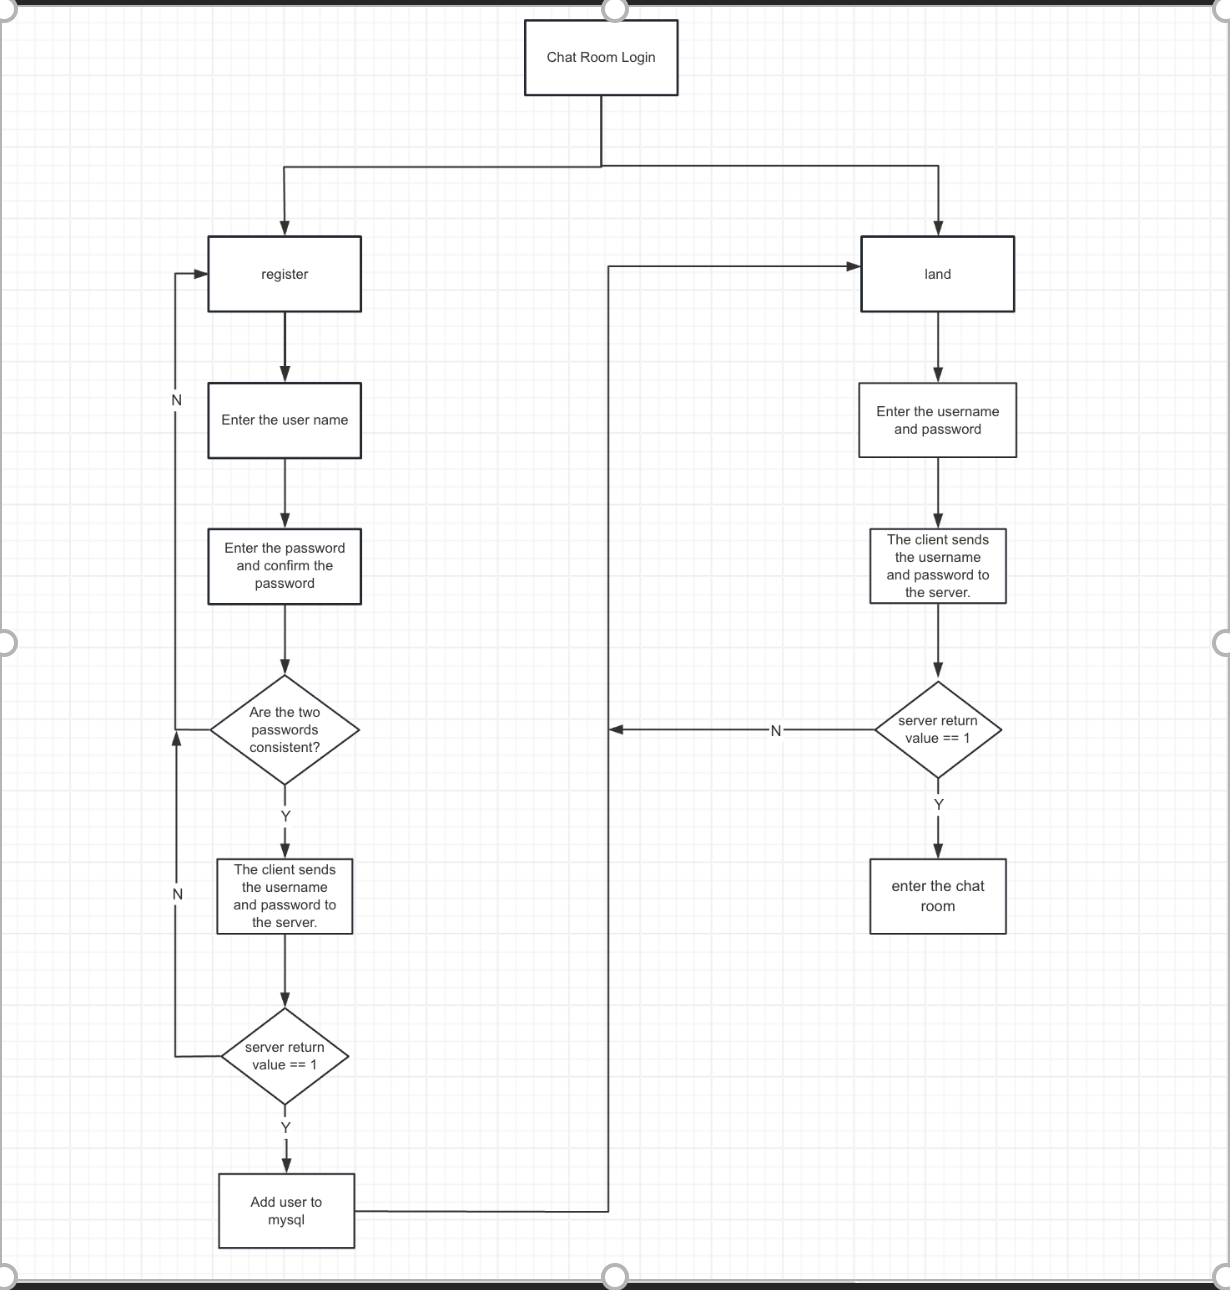
UML Diagram:
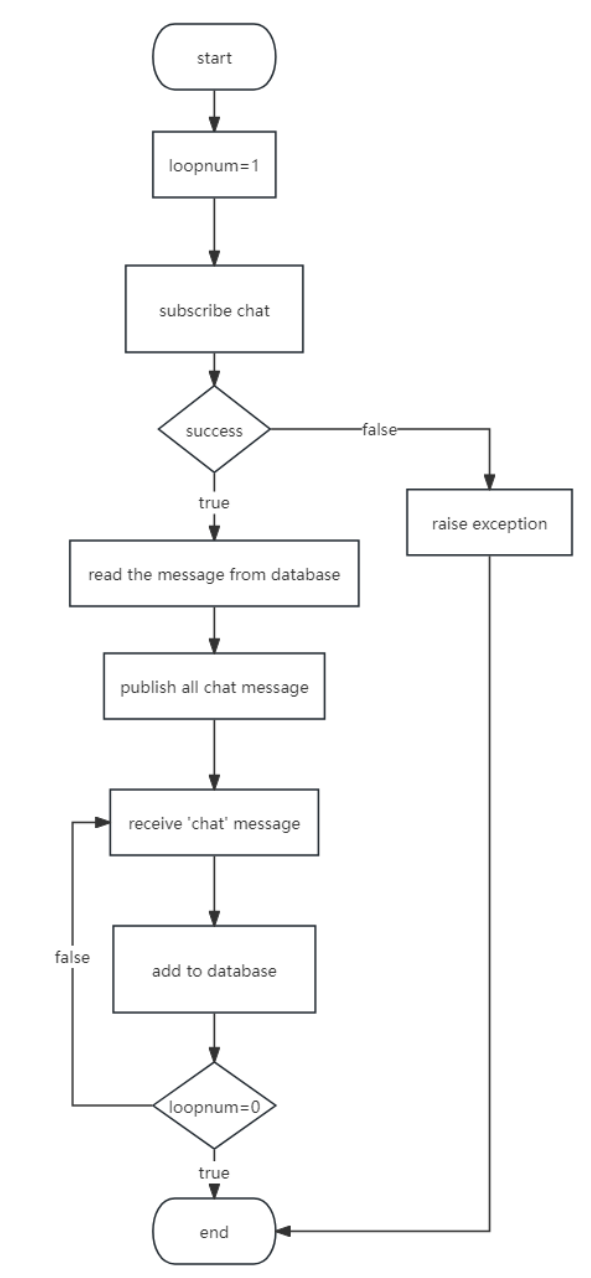
Version Control:
https://github.coventry.ac.uk/suz19/MQTT
